ST. PATTY’S DAY MAKEUP TUTORIAL #2

Hey guys!

So while, I have another St. Patty’s Day makeup tutorial coming your way, I thought to myself “why not share the slightly different look that I wore to the parade yesterday?!”

Yesterday, my husband, my son, and myself went to the annual St. Patricks Day parade in New Haven (Connecticut) and had a great time! But the couple days leading up to the parade, I knew I wasn’t the type of person to wear the funny hats, and dress in head-to-toe green; but I knew I would try to create a killer green smokey eye!
Hey, some people dress their body, I dress my face – it is what it is!

In any event, I was actually really impressed with how the look turned out (despite being crazy rushed in the morning – I’m a mom before all else, and well, baby needs to be ready first!) and I wanted to share with you how I achieved my parade-ready look!
SIDE NOTE * It was quite warm out for March, with a touch of humidity, and my makeup did…not…budge!*

If you want to see how I created this look, then just keep reading!


 Working with more pigmented, shimmery shadows than usual, I knew I wanted to do my eyes first. So I started by priming my eyes using the Urban Decay Primer Potion (still working off my little Sephora VIB sample), and then went over my lids and slightly into my crease with my NYX Jumbo Eye Pencil in ‘Milk’, and blended that out with my finger.


 First, I wanted a warm transition shade, so I mixed ‘Beaches and Cream‘ and ‘Peach Smoothie‘, both by Makeup Geek, and dusted that back and forth sloppily into my crease using a Morphe M441 brush.


 They shadows I’m using are samples of Urban Decay singles, I believe, that I received with an ULTA order sometime last year, and never really got around to playing with. So, I started with the shade ‘Mildew‘, which is a shimmery, mossy green shade with the slightest gold reflect. I tried using a Morphe M167 dampened with some MUFE Mist & Fix, but because they’re carded samples, I was having trouble picking up enough pigment, so I ended up packing it on with my finger, from the inner corner, to about halfway across my lid.

Next, I used my Morphe M433 brush to pick up some of the shade ‘YDK‘, which is a shimmery, golden/champagne-y/brown shade, and dusted that lightly over my crease where I laid down my transition shade, and running it just over the edge of the green shadow to soften the line. Then, using a Morphe M169 brush, I carefully started working in the shade ‘Blackout‘ into the outer V, and blending it out with a tapered Morphe M330 brush. You can build on that black color as much or as little as you want – I didn’t want it too dark, but I didn’t want it too light, either. Once I had almost no product left on my brush, I started to very, very lightly drag it over the green in the crease, keeping it very low – #hoodedeyeproblems.

img_9421

Maybelline EyeStudio Gel Liner in Blackest Black

Taking a baby wipe (I ran out of makeup remover wipes), I removed any fallout from under my eyes (and fair warning, there’s gonna be A LOT!) and also sharpen up the edges of the shadow, and then apply some winged liner using my Maybelline EyeStudio Gel Liner in ‘Blackest Black’ (yes, I finally replaced it!) and a Morphe M160 1/8 brush. Click here for my winged liner tutorial!


 Next I applied my foundation. I mixed Revlon ColorStay Foundation for Oily/Combo skin in the shade ‘Nude’ with a pump of the L’Oreal Magic Lumi Light Infusing Primer on the back of  my hand, and applied it with a Sigma F80 brush spritzed with MUFE Mist & Fix.


 For concealer, I’ve been trying out a sample of the MAC Pro Longwear Concealer in NW15, which I applied with my ring finger in a V shape, and blended out with a damp Real Techniques Miracle Complexion Sponge. Then, using ‘Lyric’ from the Kat Von D Shade + Light Contour Palette, I set the concealer under my eyes, and in the center of my face (forehead, nose, chin, etc) with a Morphe M438 brush.


 Back to the eyes – taking a Morphe M432 flat definer brush, I picked up a little bit of ‘Blackout’ and worked that really tightly up against my bottom lashes, matching it up to my winged liner and stopping about halfway. Then, using that M169 pencil brush again, I smoked it out using ‘Mildew’, all along the lower lash line. Finally, I just applied some Rimmel Lash Accelerator Mascara in ‘Black’ to my top and bottom lashes, and popped on some Kiss Blooming Lashes in the style ‘Tulip’.

img_9564I filled in my brows using the NYX Micro Brow Pencil in ‘Ash Brown’, and set them in place with my Anastasia of Beverly Hills Clear Brow Gel.


 I used Physician’s Formula Argan Wear Bronzer and a Morphe M527 brush to warm up the skin, and then applied a light contour to my cheekbones, forehead, nose, and jawline using Makeup Geek Contour Powder in ‘Breakup’ and a NARS ITA brush. For blush, I wanted to keep it kind of low key, so as not to compete with the eyes and make myself look too overdone, so I chose Milani Baked Blush in ‘Luminoso’ on an angled blush brush (mine is from Walgreens) and used my Morphe M501 to apply BECCA Shimmering Skin Perfector in ‘Opal’ to my cheekbones, cupids bow, and the tip of my nose.


 Finally, for the lips, I chose Almay Smart Shade Butter Kiss Lipstick in ‘Nude Light/Medium’, and gave myself a bath in MUFE Mist & Fix. And voila! All done!


 And there you have it! My completed St. Patty’s Day parade look!
Sure, I could have just slapped on some green eyeshadow and walked out the door, but what kind of fun would that have been?! This look would be great if you’re headed out with your friends to a local pub (if you’re old enough!) or if you just feel like being a little extra festive that day!

Most importantly, have fun with it – make it your own! Makeup is supposed to be fun!! And if you recreate this look, tag me on Instagram (@dlynnesposito) so I can see it, too!

Come follow me around social media!
Twitter, Pinterest & Instagram : @dlynnesposito
Facebook : Affordable Gorgeous
Snapchat : dlynnesposito

And feel free to reblog this post and share my social media with your friends! Your support means so much!

LOTS OF LOVE!!
img_9363-3

SPRINGTIME PINK MAKEUP TUTORIAL

 Lately with all the spring trends popping up in magazines and on the internet, I’ve been totally feeling spring makeup vibes! Maybe I can entice it to make an early appearance by using spring colors, what do you think?

In any event, on a recent Pinterest binge, I came across this board, #glossierpink, and it’s from the company Glossier, who’s primary focus is on skin care first, and makeup second. They have a great selection of beauty products created based on feedback from women like you and me, which is really cool. But all the pinks, you guys; they inspired me. They had the most gorgeous, springtime blush tones, and I knew that I wanted to build a look around all pinks!

So if you want to see how I created my #glossierpink look, just keep reading!


Starting with the skin, I’m going to be priming my face with Revlon PhotoReady Perfecting Primer, to smooth any lines and fill in my pores. Once that sets into the skin, I’m going in with Maybelline Fit Me Stick Foundation in 11o, and then blend it out with a flat top kabuki brush (mine is no-name, but it’s the same as a Sigma F80).

Then I’ll conceal and highlight under the eyes, the forehead, down the center of the nose, the cupids bow, the sides of the nose, and my chin, using NARS Radiant Creamy Concealer in ‘Vanilla’, and blend it out with a damp sponge, and immediately set the concealer with ‘Banana’ from the Anastasia Beverly Hills Contour Kit and a Morphe M438 brush.

Now I’ll be contouring, using my new Makeup Geek Contour Powders. First I’m going in with ‘Breakup’, which is made for porcelain skin with cool undertones, with a NARS ITA brush. Then, for a slightly more sculpted and dimensional look, I’ll add a little bit of ‘Infidelity’, which is a cool toned shade for fair skin, on an e.l.f. Small Tapered Brush, concentrating it more towards the ears, where I want my contour the darkest. Next, using my Real Techniques Blush Brush, I’m going to apply L’Oreal True Match Blush in the shade ‘Innocent Flush’ to my cheeks. To highlight, I’m using my Physician’s Formula Mineral Glow Pearls (which are no longer ‘pearls’, see my DIY post here) for a soft, radiant, pink glow, on the cheekbones, tip of the nose, and cupids bow.

Now onto the eyes! If you haven’t already primed your eyes with your concealer (like I usually do) you can do that, or use your favorite eyeshadow primer. I’ve been loving my LORAC Behind The Scenes Eye Primer that came with my Pro Palette 1 & 2 – that stuff grabs on to your shadows and they don’t budge!

So for this look, I decided to use all Morphe eyeshadows. And you guys, for $2.29 eyeshadows….they’re gorgeous. You know by now my love for Morphe products. I don’t have to tell you. I’m going to start by picking up the shade ‘Swine’, which is a light, neutral mid-toned brown transition shade, and dust that in the crease using a Morphe M433 brush. Back and forth, in windshield wiper motions, and then small circles, focusing most of the product on the outer corner.

Now, I’m going to pick up the shade ‘Peekaboo’, which is kind of a mauve-y pink shade, and using the same brush, put the right over the first color. Back and forth, buffing it in and making sure there are no harsh lines.

Next, I’ll take the shade ‘Pretty In Pink’ (a matte, cotton candy pink) on a Morphe M330 brush, and apply that on top of the first two, keeping it very low in the crease.

Finally, using my finger, I’ll pat a little ‘Wink For Pink’, a shimmery, pearly baby pink, onto my lid, and then go back to the M330 with no additional product on it, and just buff out the line between the shimmery shadow and the ‘Pretty In Pink’.


Now that your shadows are on, go ahead and add some winged liner (or not, totally up to you!). I did a thin wing (see the photo below) with Maybelline EyeStudio Lasting Gel Liner in ‘Blackest Black’ and a Morphe 160 1/8 brush. Check out my winged liner tutorial here.

 For the lower lash line, I’m going to pick up a little of the shade ‘Treasure’, a slightly shimmery warm brown, on a Morphe M432 brush, and wiggle that into my bottom lashes but only on the outer third of my eye. Then I’ll blend it out by taking some ‘Swine’ and ‘Peekaboo’ on an M169 pencil brush and run it back and forth along the lower lash line, right over ‘Treasure’.

Now I’m going to highlight the inner corner and brow bone with that same Physician’s Formula highlight that I used on my cheeks on a clean M169, and apply a few coats of Covergirl LashBlast Clump Crusher Extensions Mascara in ‘Very Black’ to my top and bottom lashes.

Don’t worry, we’re almost done! But we absolutely can’t forget the brows – after all, they frame the face, and help to pull the whole look together. I’m going to fill them in with my NYX Micro Brow Pencil in ‘Taupe’, and set them with the Anastasia Beverly Hills Clear Brow Gel.

Finally, for the lips, I slightly over-lined them with NYX Retractable Lip Liner in ‘Nude Pink’, and then applied Revlon Colorburst Lip Butter in ‘Pink Lemonade’ over the top. Give yourself a bath in some setting spray; I used Urban Decay Chill Makeup Setting Spray, and we’re done!


Wow, that was a long one! But for someone who usually sticks to neutral shades and brown tones, I’m really feelin’ these pink tones! I hope you guys enjoyed this look! Leave me a comment below and let me know!

Come follow me around social media!
Twitter, Pinterest & Instagram : @dlynnesposito
Facebook : Affordable Gorgeous
Snapchat : dlynnesposito

And feel free to reblog this post and share my social media with your friends! Your support means so much!

LOTS OF LOVE!!
img_9363-2

DRUGSTORE MAKEUP KIT FOR BEGINNERS

 Hey guys! Every so often I go through my collection and sort of ‘declutter’. Basically I get rid of things that I’m not using or don’t like or what have you. If I find unused or just barely swatched items that are age-appropriate, I usually pass them on to my step-daughter, who at almost 14, is taking quite an interest in all things beauty.

And the same is true for many girls her age. However, thanks to YouTube, these 13 and 14 year old girls want the expensive stuff – MAC, Urban Decay, Marc Jacobs – and not only is that stuff not always in the budget, but for girls who are just learning, and will likely be wiping off too-heavy foundation or concealer while they perfect their technique, practicing with a $60 foundation or $30 concealer just isn’t, well…practical.

So if you want to see my recommendations for a beginner’s makeup kit, just keep reading!


BB CREAM & FOUNDATION 


 Nine times out of 10, if you’re a young girl, you have pretty great skin. Until you hit those pesky teenage years. Even then, you might be blessed enough to be the girl that has a flawless complexion (I was not). If so, then a BB cream will suit your needs just fine. One of my favorites is the Maybelline Dream Pure BB Cream ($9) (and I’m pushing 30!) which is oil free and contains Salicylic Acid to help treat and prevent breakouts. It offers decent coverage (think sheer but buildable to a light/medium) and is great for evening out your skin tone and covering a bit of redness.
However, if you’re someone who is more comfortable with a fuller coverage, I recommend the Revlon ColorStay Whipped Cream Makeup ($15), which is a medium coverage foundation, perfect for all skin types, and it covers imperfections very well, without ever feeling or looking heavy.

CONCEALER 


 Chances are you don’t have many dark circles to cover, but if you do, color correcting before concealing is super important. NYX Dark Circle Concealer ($6) is great for that, because it corrects and conceals all at once.
If you’re looking for a do-it-all concealer, especially for blemishes or acne scarring, Maybelline Fit Me Concealer ($7) and Maybelline FaceStudio Master Conceal ($9) are both fantastic options. Maybelline Fit Me has a very light, gel consistency, but offers a solid medium coverage, and the Maybelline FaceStudio Master Conceal is a creamier formula, which will make any blemish disappear. Be sure to set these with a powder though, as they can be prone to creasing.

POWDER


 Every girl needs a good translucent powder in her arsenal. It can set your foundation and concealer, make you look airbrushed, and help ease the blending process for any blush or bronzer you plan to use. One of my faves is the e.l.f. High Definition Translucent Loose Powder ($6). It’s inexpensive, and it’s been compared to super fancy, high end brands!

BLUSH & BRONZER


 Blush and bronzer are definitely very important. They bring warmth and dimension back to your face. I’m not talking contouring – that’s way too dramatic for school-aged girls. But a nice light wash of bronzer like Rimmel Natural Bronzer ($5) is great for bringing the life back your skin. It’s matte, waterproof, looks very natural, and it’s not too orangey or warm.
As for blush, one of my absolute favorites that works on nearly every skin tone is the Milani Baked Blush in ‘Luminoso’ ($8). It’s a universally flattering peachy-pink shade that contains a very subtle amount of super fine shimmer. It’s barely detectable, but it just leaves you looking glowy and healthy.

BROWS


 This is all based on personal preference. However for beginners, I would definitely steer clear of any pomades – they’ll look too harsh and overly sculpted, plus they can be tricky to use. I always like to recommend brow powders (or even eyeshadows!) for beginners, as they’re the easiest to work with and the most natural looking. I’ve recently gone back to filling mine in with powder again, using the Salon Perfect Brow Defining Kit ($9), which comes with three brow shades, a highlight shade, a dual ended brush/spoolie, and a waxy crayon to help keep everything in place.

EYE MAKEUP


 Makeup is all about experimentation – and what better way to express yourself than eyeshadow? The one brand I will recommend ten times over is Morphe. Their palettes contain 35 colors each, though there are a few smaller, 12 pan palettes, and they’re around $20! You won’t EVER find a deal like that at your local drugstore! They range from dark smokey colors to neutrals to vibrant hues! And they’re amazing quality – if you’ve been around here with me for awhile you know that I have a special place in my heart for all things Morphe.

Mascara, on the other hand, will be all about individual needs and desired effect. I will say though, that Covergirl’s Lash Blast line is incredible, and Maybelline has some great ones too – my fave from Maybelline is their Volum’ Express Pumped Up! Colossal Volume Mascara ($8), which gives lift, volume, length, and it doesn’t move, all day long. Plus it’s hot pink chubby tube will never, ever get lost in your makeup bag!

LIPS


 Ohhh this is a fun one for me. You know how much I love my lippies. I definitely advise against fully opaque, traditional lipsticks – let your natural beauty shine! I love, love the NYX Butter Gloss ($5) line, especially in the shade ‘Angel Food Cake’ which is flattering on everyone – and they smell like cupcakes!
If you prefer a lipstick, I highly recommend the Revlon Colorburst Lip Butters ($9), or the Almay Smart Shade Butter Kiss Lipstick ($7) (both made by the same company) which is kind enough to break it down by skin tone, helping you find your perfect shade. I’m partial to the shade ‘Nude Light/Medium’ myself – it’s the perfect MLBB (my lips but better) shade! They have nudes, pinks, berry shades, and reds for every skin tone!
If you’re a stain kinda girl (I love them, you don’t have to reapply them after lunch!) then I recommend the L’Oreal Colour Riche Caresse Wet Shine Stain ($8), which goes on like a gloss, and fades to a pretty stain – I believe they might be being discontinued though, so look on Amazon or eBay, or keep an eye out in your local discount/dollar store!


 Ok, so I know it’s a long list – and by no means do I want you to feel like you have to purchase every single product listed – this is merely a guide to get you started! Feel free to tailor it to your needs, wants, and budget!
Have you guys tried any of these products? What are some of your favorite beginner items? Leave me a comment and let me know!

Come follow me around on social media!
Twitter & Instagram : @dlynnesposito
Facebook : Affordable Gorgeous
Snapchat : dlynnesposito

And feel free to reblog this post and share my social media with your friends! Your support means so much!

LOTS OF LOVE!!
img_9363-3

EVERYDAY ‘MOM’ MAKEUP ROUTINE

Since I’m a SAHM (stay-at-home-mom) my beauty routine is pretty minimal – most days I focus on my regular skin care and not much else. My son could care less what I look like, and my husband is the “you’re beautiful without makeup” guy – bless his heart, he’s a keeper!

But let’s face it, there’s something about putting on makeup that just makes you feel good. For me, it’s about that little bit of “me time” where I get to play around with color combos and finishes and textures and create new looks, which in turn, I get to share with you guys!

When I find that I just need that little pick-me-up, or I have to run out for some errands and I know I’ll be gone for awhile or may run into people I know, it makes me feel good to know that I’ve put that little extra effort in. And that’s what this look is about. It’s very minimal, just a few products, but it really does make all the difference!

So let’s get started!


 So like I said, I always make sure my skin is in prime condition before letting a drop of makeup touch my face! I always cleanse, tone, and moisturize, and then apply a primer. For days where I’m doing absolute minimal makeup, I tend to reach for the L’Oreal Magic Lumi Light Infusing Primer ($13). “But wait, aren’t you oily?” Well, yeah, but hold that thought!


 Recently I’ve been reaching for my Maybelline Dream Pure BB Cream ($6.29), which is oil-free (hence the illuminating primer) and contains salicylic acid, which is great for treating any existing breakouts, as well as preventing future ones. I find that I get a solid light to medium coverage with this, and most days I’m perfectly comfortable just wearing this. But…..


 Since I’m not going for a flawless face (it’s mostly to conceal minor redness) I’m not going to ‘power-conceal’ like I might if I were headed somewhere like out to dinner or a family gathering – I’ll spot conceal where I absolutely need it with my Maybelline Fit Me Concealer ($6.49) in the shade Fair, and touch a little into the inner corner of my eyes to conceal some darkness and brighten up that area. Then I always set the under eye area because I will crease, it’s almost guaranteed. I like the e.l.f. High Definition Under Eye Setting Powder ($3) for this, and just a Real Techniques Setting Brush ($8).


 I’m someone that always, always has to fill in my brows – one is thicker than the other, one is shorter than the other, they’re a hot mess. You can check out my brow routine here. If I don’t have time for a full brow routine, I’ve been reaching for my ULTA Brow Tint ($10) in the shade Light, which makes them look fuller and keeps them under control.


 I don’t go all shadow crazy on days like this, but I will throw on some mascara – I really like the Maybelline Pumped Up! Colossal Volume Mascara ($4.20) lately – and mines almost out so I’m trying to get every last drop out of the tube before I go buy a new one – I don’t know why, it’s so inexpensive I really should just toss it and keep it movin’!


 Since the BB cream isn’t heavy coverage like most foundations, and I’m still able to see my skin through it (freckles and all) I see no pressing need for bronzer and blush and all of that. But I absolutely have to contour my nose (it’s just personal preference and takes me all of a minute) so I use some NYX HD Blush in Taupe ($7) and take it on a super fluffy eyeshadow blending brush like the SOHO Pro Crease Blending Brush ($10.50), and just run it down either side of my nose, across the tip, and blend it up into the inner part of my brows. I also like to blend a little bit lightly into the crease of my eye to contour that too, for a natural look. When you’ve got concealer or foundation or anything on your lids it can make them look too flat and make your eyes look smaller. This techniques just adds a touch of definition.


 Now to get my glow on! Using my Morphe M501 ($8) brush, I pick up a little Wet N Wild Color Icon Bronzer in Reserve Your Cabana ($4) and dust that along the tops of my cheek bones, the side of my eyes, and down the center of my nose. This just makes you look nice and healthy, not overly highlighted.


Photo Credit : Writing Whimsy

 And finally, any neutral color lip gloss, lipstick, anything will do here. I always have the Almay Smart Shade Butter Kiss Lipstick in Nude Light/Medium ($8.01) in my bag – it’s a great ‘my lips but better’ shade and I can literally apply it without a mirror, it’s that easy to use!


That’s it! This is a perfect look for running errands, taking the littles to a play date, even going to lunch with some friends! Or if you’ve got chores to do around the house but you’re feeling a little sassy, this is totally appropriate for that too!

I hope you guys enjoyed this post! Let me know some of your favorite products for busy/minimal makeup days! Leave me comments below!

And please go follow me on Twitter and Instagram @dlynnesposito, and go like the Affordable Gorgeous page on Facebook!

LOTS OF LOVE!

img_9363-3

OCTOBER FAVORITES 2015

HELLO HELLO!! It’s that time of the month again!

NO, NOT THAT TIME! 

It’s time for my October favorites! All thethings I’ve been LOVING this past month! This time I decided to include a little bit of everything – beauty, skin care, fashion, EVERYTHING. Last month I kept it strictly beauty related because I had just done a FALL favorites post, so this month I thought I would mix things up a bit – leave me a comment below and let me know which you like best, just beauty or a little bit of everything!

LET’S GET STARTED! 


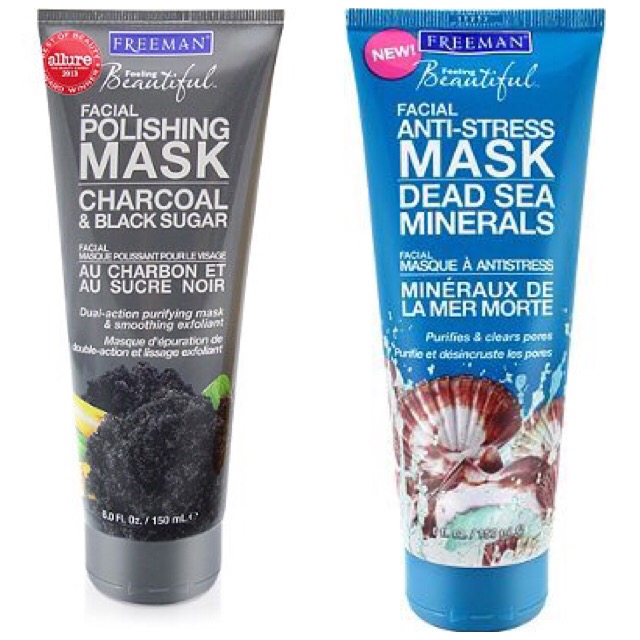
FREEMAN FEELING BEAUTIFUL MASKS ($5)

 I have a few of these, but my faves lately have been the Charcoal and Black Sugar Polishing Mask and the Dead Sea Minerals Anti-Stress Mask. The polishing mask is a favorite for days when I’m feeling extra dry and flakey, or I’ve had heavy makeup on. Since it’s rather gritty, and over-exfoliating isn’t good for your skin, on ‘off days’ I like to use the Dead Sea Minerals Anti-Stress mask. It’s great for de-gunking your pores, and the smell is SOOO relaxing, and I won’t lie, I love the bright blue color. And scaring the crap out of my husband! HAHAHA!!

E.L.F. LIP EXFOLIATOR ($3)

 This has become a regular part of my night time skin care routine. My lips get SUPER dry and flakey in the fall and winter, so bad that regular lip balm is no match for them! So I use this at night and follow it up with some Vaseline, and I’ve noticed a huge difference in the condition of my lips. This too, is a pretty grainy product, but it’s basically made of Vitamin E, Shea Butter, Avocado, Grape and Jojoba Oils, and sugar, to slough away any trace of dry skin. And I believe this is one of the E.L.F. products offered at CVS nationwide (they don’t carry the ENTIRE line, just a selection of it), so it’s even easier to get your hands – or lips! – on them!!

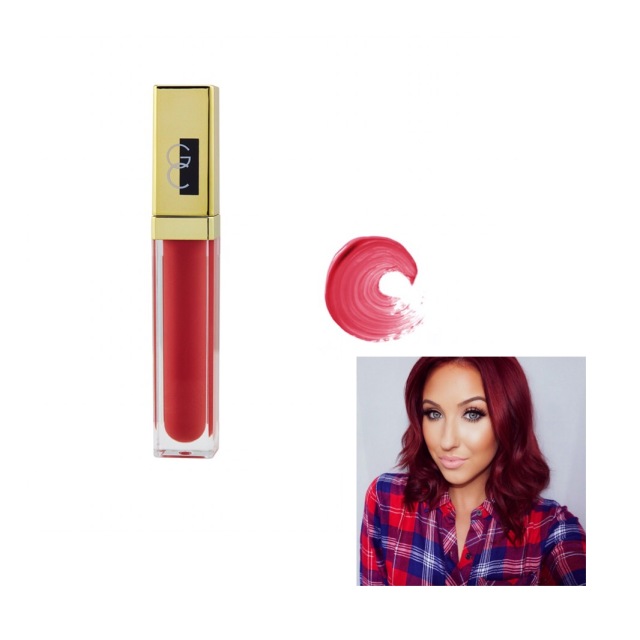
GERARD COSMETICS COLOR YOUR SMILE LIGHTED LIP GLOSS IN ROSE HILL ($24)

 Now I’ll admit that this was quite the splurge for me – $24 for a lip gloss – crazy, right?! But if you consider how INSANELY pigmented this stuff is, and how wonderfully long lasting it is, I think it was worth the splurge. It’s the first baby created by YouTube beauty vlogger and professional makeup artist Jaclyn Hill, and it is, to quote her,”amaze-balls!”. It’s not too pink, and not too red, and I find MY favorite way of applying it is to just put a little in the center of my bottom lip and then blend it out, so it’s leaving more of a stain. Of course you can go balls-to-the-wall and go for a nice, thick layer of it and it’s BEAUTIFUL. But I like the pretty, natural, just bitten look I get from just a small amount. AND it’s got a built in light in the wand, and a mirror on the side, making application in low light or ANYWHERE really a BREEZE! ❤

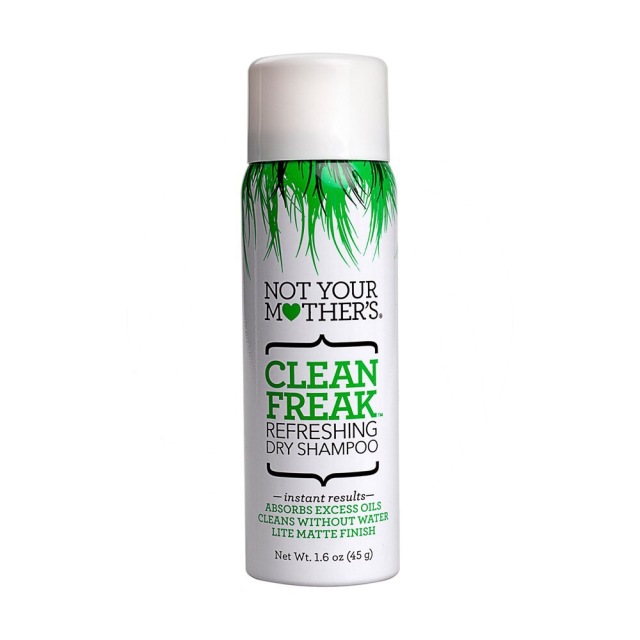
NOT YOUR MOTHERS CLEAN FREAK DRY SHAMPOO ($7)

 I FREAKIN’ LOVE dry shampoo. I don’t know if it’s because it’s just too much hassle to wash my hair as often as I should (#SAHMprobs) or because they offer flexibility in styling by adding volume and texture to the hair, or because they’re so portable and convenient. But after trying pretty much every dry shampoo out there EXCEPT this one, I figured ‘why not?’. It was on sale, which is ALWAYS a win for me, and it claimed to leave no residue, and a light matte finish. Now because I’ve yet to find RED dry shampoo (they make blonde and brown, why the hell not red?!) to match my ruby red hair, I was anxious to find something that wouldn’t leave me with that white cast at the root, or looking pink. This stood up well. Me like-y.

MAYBELLINE VOLUM’ EXPRESS PUMPED UP COLOSSAL MASCARA ($5)

 This is sort of a rediscovered favorite for me. I picked this up awhile back because I’ve always been impressed with Maybelline mascaras, and I just love voluminous lashes and big, fat, bristle brushes. But my FAVORITE thing about this mascara is that it doesn’t flake or smudge during the day. The brush is a little tricky, as it’s tapered a LITTLE bit at the end, but still kinda tricky to maneuver into the inner corner and grab the little baby lashes, but it gives AMAZING volume and pretty great length too. I’m trying to use it up so I can buy a new one, but it’s DEFINITELY one that I plan to repurchase again and again.

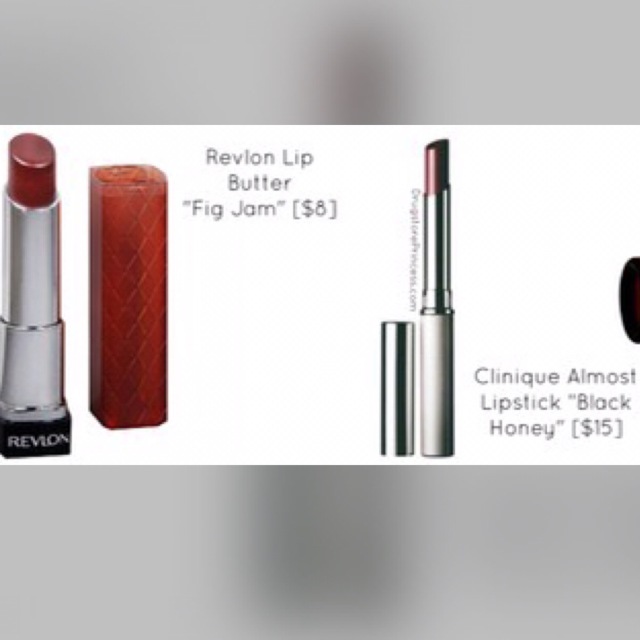
REVLON COLORBURST LIP BUTTER in FIG JAM ($7)

 If you’re looking for a great fall color, this is it. It looks crazy brown in the bullet, but when you apply it to your lips it does something magical with your own natural lip color – I can’t explain it. It’s a lovely autumn shade that goes with any look, from a smokey eye to minimal makeup, and BONUS – it’s a total dupe for the Clinique Almost Lipstick in Black Honey ($17), and who doesn’t love a good dupe?!

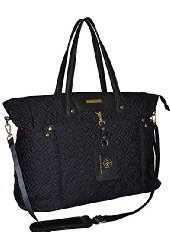
ADRIENNE VITADINNI 17″ QUILTED NYLON EAST WEST LAPTOP TOTE ($90)

 I was in TJ Maxx the other day, and while I was walking around looking for my nephews birthday gift, took a stroll through the handbag department, as per usual. That’s where I spotted this. I needed a fall bag, and while yes, this is quite large for the everyday bag, I also tend to carry a sizable makeup bag, diapers, wipes, food, assorted toys, etc. So the multitude of storage, lots of pockets, all these things appealed to me. Now I managed to get this on sale for $40, which is why I’m including it in the post, but if you don’t have a TJ Maxx near you and you happen to love this bag as much as I do, the link is above. Let me be clear in saying that before any purchase over $20, I have a rule – I go home, sleep on it, and if I’m still lusting after it the next day, and can afford it, I’ll go get it. Well, they originally had one in an olive green, so the black one here was my second choice. BUT I think it was a good move. Black is classic, and I can use this forever. It would even be great to travel with as a carry on, as soon as we have the means of course!

BIGELOW PEPPERMINT TEA ($3)

 In the fall and winter, I love tea. At any given time I have 4-5 boxes of different teas in my kitchen. Ever since I had my gallbladder out in June of 2015, I’ve had some lingering stomach issues, mainly nausea and the inability to tolerate too much caffeine, dairy, fat, etc. So usually in the afternoon and right before bed, I make a big cup of peppermint tea with about a teaspoon or so of honey, and it helps to just relax my entire body, tummy included. And I’ve noticed that by scaling back on the coffee and having more tea, my skin is clearer and my teeth are whiter, and I’m able to unwind much easier at night. Plus it’s just so soothing and cozy.


What are some things YOU guys are loving for the month of October?! Leave me a comment and let me know!

And as always, go follow me on Twitter and Instagram @dlynnesposito to keep up with me!

LOTS of LOVE!!

XOXO – Donna

BEST ‘YOUR LIPS BUT BETTER’ PRODUCTS

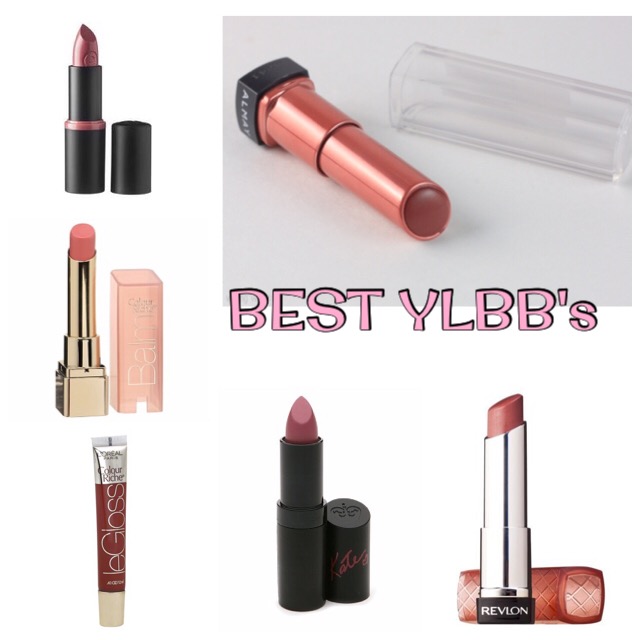
  With the never-ending choices of lip colors on the market, from nudes to reds, pinks to plums and so on, it can seem like such a daunting task to just find that perfect shade. You know the one I’m talking about – the one that makes people think “what is that lip color she’s wearing? IS she wearing a lip color? I WANT LIPS LIKE HERS!”. THAT, my dears, is known as the YLBB or MLBB (your lips but better or my lips but better) and it seems like it’s almost impossible to find. So I’ve compiled a list of shades from across the board that work on practically ANYONE, from the fairest of the fair, to the deepest, richest skin tones! Let’s get started!


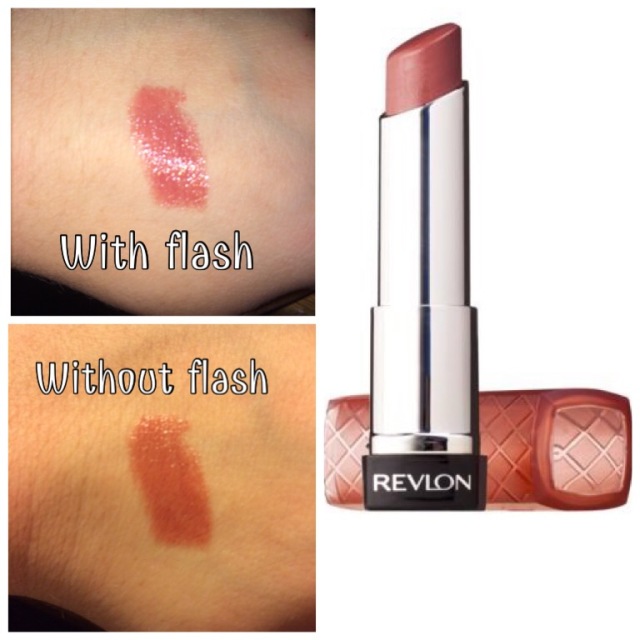
REVLON COLORBURST LIP BUTTER in PINK TRUFFLE ($6/WalMart)

  If I were to go in order of favorites, this would totally be my top pick. I have backups upon backups of this shade, for fear that they’ll discontinue it like one of my other faves, Macaroon, and it LOOKS like Fig Jam may be on it’s way out too! *sad face* But this is the perfect rosey-nude that just makes you look like you have gorgeous, perfectly pink, super hydrated and healthy lips. It’s always with me, and it’s one that I don’t even need a mirror to apply or touch up. It’s my ride or die.

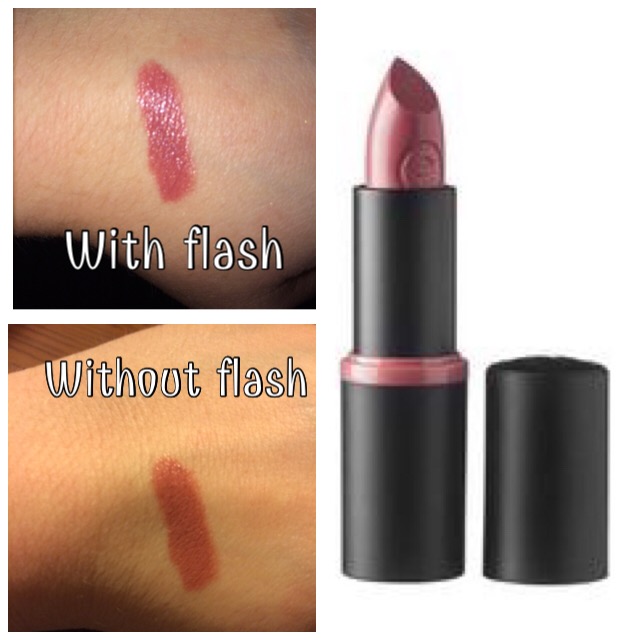
ESSENCE LONGLASTING LIPSTICK in BARELY THERE ($3/ULTA)

  I don’t know that I believe the ‘long-lasting’ claim for this PARTICULAR shade, but maybe I just can’t tell because it almost perfectly matches my natural lip color. I DO have other shades, like ‘I Am Yours’ and ‘Natural Beauty‘ that do seem to last quite some time, so I’ll give it the benefit of the doubt. However for being a long wearing lipstick, I have to say that it’s VERY comfortable on the lips. You know how some can make your lips feel tight and dry? Yeah, not these. I wouldn’t go as far as to call them MOISTURIZING, but they definitely feel very nice.

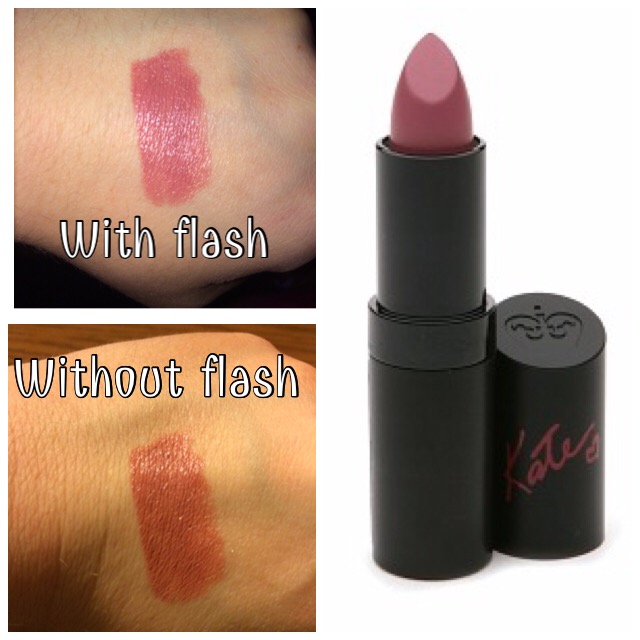
RIMMEL LASTING FINISH by KATE MOSS LIPSTICK 08 ($4/drugstore.com)

  This is a beautiful dusty rose shade, that’s slightly lighter than my natural lip color, but still a great every day hue. I, personally, haven’t found these to be terribly long lasting, and I would highly recommend prepping your lips by exfoliating and maybe using a light balm underneath, especially if you’re dry because it can apply a little on the clingy side, but I still find this to be one I reach for quite often.

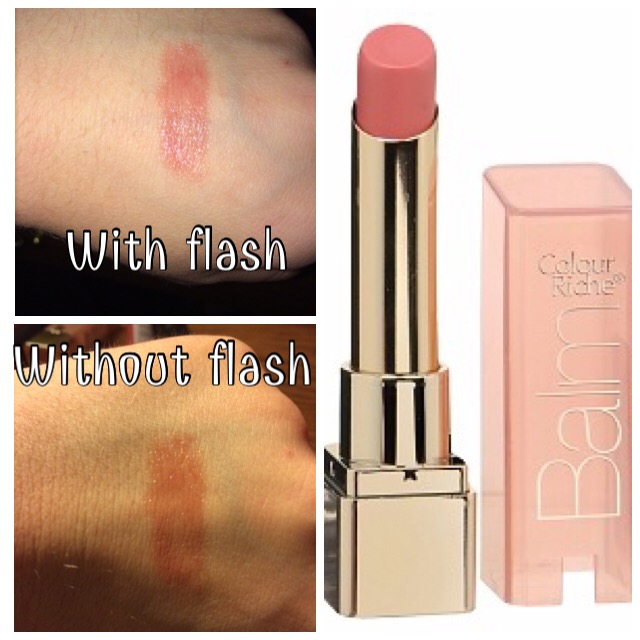
L’OREAL PARIS COLOR RICHE LIP BALM in NOURISHING NUDE ($6/WalMart)

  Yet another shade that I have multiple of – this and Tender Mauve – because they’re just THAT amazing. This definitely leans more to the sheer side, because it is, after all, a tinted lip balm. But my oh my is it beautiful. One thing I don’t really love is that the cap seems to be a little on the flimsy side for my liking, and I’ve cracked a few of them along the way. But when I’m having a no makeup day and just need a little hint of tint, these are ALWAYS nearby.

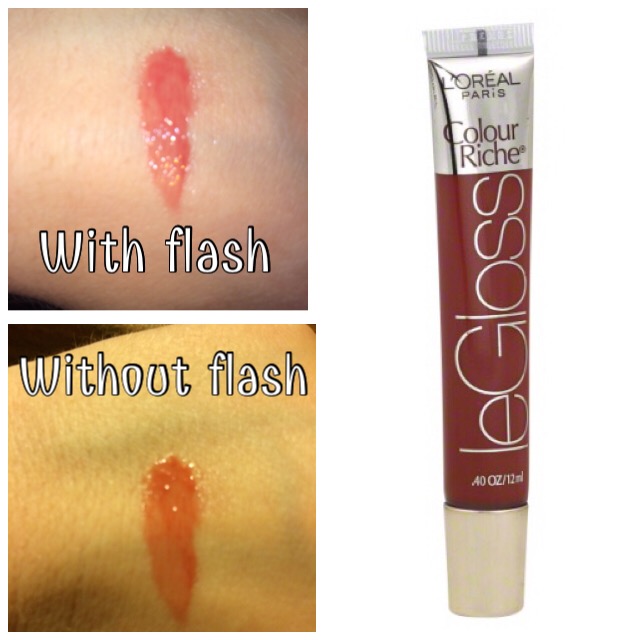
L’OREAL PARIS COLOR RICHE LE GLOSS in REALLY ROSE ($6/WalMart)

  I’m gonna call a dupe alert on this one! While I haven’t tried it myself yet, I’ve seen on Pinterest that this shade is a dupe for NARS Dolce Vita lip gloss. And if I can find a good drugstore dupe, you KNOW I’m all over that! If I had a real gripe about these glosses, it’s that they really have very little staying power. But the shade is just gorgeous, like you bit your lips and put a little gloss on (ya know, the old school way). GAWGEOUS!

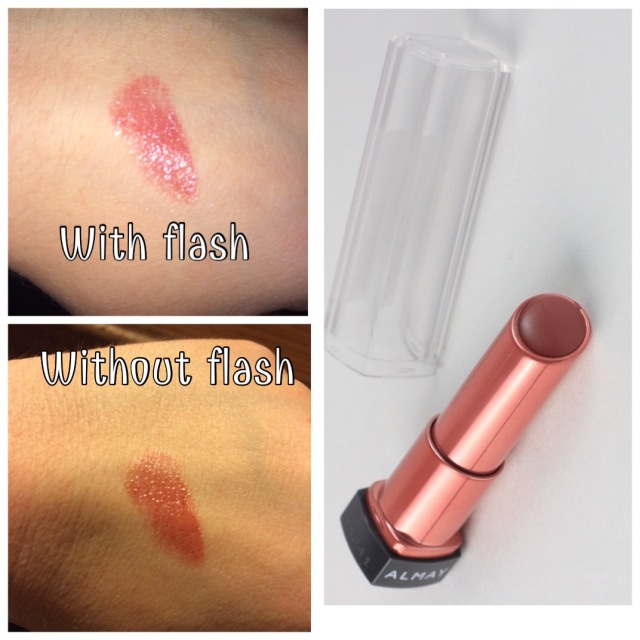
ALMAY SMART SHADE BUTTER KISS LIPSTICK in NUDE LIGHT/MEDIUM ($6/Target)

  These are incredibly similar to the Revlon Colorburst Lip Butters, probably because they’re made by the same company! Right down to the packaging, they’re nearly identical. BUT because Almay took pity on those of us who stand staring at a lipstick display like a deer in headlights, they broke it down to pinks, nudes, berries, and reds according to your skin tone. So light, light medium, and dark all have their own shades of the aforementioned colors. This doesn’t mean you have to stay within those guidelines of course! I fall into the light category, but prefer the shades in the light/medium. They allow your natural lip color to shine through, as they’re a bit more sheer than their Revlon cousins, and more like a balm than a lipstick. But nonetheless, there’s always this shade in my bag!


I really hope this helps you guys! I know for the longest time I was clueless as to how to find that perfect shade, and then I discovered the term ‘YLBB‘ and took to none other than Pinterest! Do YOU have a favorite YLBB? Leave me a comment below!

And don’t forget to follow me on Twitter and Instagram @dlynnesposito.

LOTS OF LOVE AND LIPPIES!

XOXO – Donna