FEBRUARY 2016 FAVORITES

Ok, I know February is a short month, but geez! It breezed right by!

I’ve really been trying to incorporate some new or ‘under-loved’ products into my regular routine, because they’re either close to empty and I want to use them up, or they’re ‘rediscovered faves’.

Let’s get started!


BITE BEAUTY SMASHED AGAVE LIP MASK ($26)

img_0248I swear the weather up here in New England has reached a whole new level of crazy. Like ‘Britney Spears when she shaved her head’ crazy. And with that has come parched lips. This lip mask is a God send. So much so that despite it’s $26 price tag, I ordered three of them. One for my vanity, one for my purse, and one as a backup. I know. I’m nuts, right? But it’s that good. It’s got a gorgeous universal red-wine tint, and it’s packed full of high quality ingredients like Lanolin, vanilla extract, natural olive fruit, and jojoba oil. It comes in an un-tinted formula, as well as one thats a rosy champagne-y color, but this sheer red just spoke to me. And it’s freakin’ amazing.

MAYBELLINE FACESTUDIO MASTER CONCEAL ($9)

img_9710This is one of those ‘rediscovered favorites’. It kinda got buried in my collection, and recently while I was searching for something to conceal my ‘mommy hasn’t slept in a week’ dark circles, this all but jumped out of the drawer at me. It’s thick and creamy, but blendable, and has amazing coverage. I use the shade ‘Light’ under my eyes, and ‘Fair’ to conceal any blemishes, and it does the job without fail. Because it’s so creamy, though, this is one of those concealers that you must set with a powder, or it will absolutely crease. But it’s awesome.

SALON PERFECT BROW DEFINING KIT ($9)


 Since running out of my trusty NYX Micro Brow Pencil, I’ve been filling in my brows with powder, and I’ve been loving it! This kit comes with three brow shades, a highlight shade, an angled brush/spoolie duo, and a wax pencil (which I don’t really use). I find that my brows look more natural than ever, which is great for those minimal makeup days where I don’t want my brows to overtake my face, but I definitely want them filled in. When set with a good brow gel, the color stays put all day! One thing I like to do to ensure it doesn’t fade at all is run a little bit of my eyeshadow primer through my brows, and then fill them in. Those babies aren’t goin’ nowhere!

COVERGIRL LASH BLAST CLUMP CRUSHER EXTENSIONS MASCARA ($8)


 I have pretty much every ‘Lash Blast’ mascara out there, and ‘Clump Crusher’ is by far my fave. Until I found this in my local CVS one day. I actually applied it in my truck in the parking lot, with no other makeup on, because I was so excited. And it totally delivered! My lashes were defined, slightly volumized, noticeably longer, and it seemed to even curl them a little as well! My eyes looked wide open and awake, and even though I had no powder under my lower lash line, which guarantees a smudge-fest, it didn’t transfer! It applied easily to both my top and bottom lashes, which is uncommon – I usually have to use a different mascara with a smaller brush for my bottom lashes – and it made them long and gorgeous! I’m in lash heaven!

ARDELL DEMI WISPIES ($10 for 4 pairs) 


 I’m not a regular wearer of false lashes – I mean, c’mon, I’m a stay at home mom; I barely put regular clothes on during the week! False lashes are typically a ‘special occasion’ thing for me, but a couple weeks ago I was feeling especially sassy, and decided to throw a pair on, and I find myself wearing them more often than not now! It’s to the point where it’s almost easier to throw on a pair of Demi Wispies than it is to try to achieve a similar look using three different mascaras. And far less time consuming. What I love about these is that while, yes, they can be quite full and glamorous, they also work well for day to day wear, to really enhance the eyes and open them up. They work well with a blown out smokey eye, or how I’ve been wearing them, with a dusting of a neutral matte brown in the crease, and that’s it. With the literally thousands of styles of false lashes on the market, it amazes me how truly versatile one particular style can be! If you’ve been wanting to try false lashes but can’t decide where to start, start with these!

ESTEE LAUDER DOUBLE WEAR STAY-IN-PLACE POWDER MAKEUP ($40)


 Yet another product that seemed to get lost in my ‘black hole’ drawer of pressed powders, I pulled this out recently when I was battling a few blemishes. The reason behind it, and how I have been using it? To spot-set my concealer, and just provide the teeniest bit of extra coverage to particularly angry blemishes. This is also great if you’re someone who doesn’t wear foundation on a regular basis, but gravitate more towards concealer, and want just that touch of coverage and oil control without looking like you have anything on your skin. Basically the way I use it to spot conceal is to apply my regular concealer (or heavy duty, depending on the job) and take a pointed eyeshadow brush, like a pencil brush, and dab it right over the concealed blemish. It helps to set it in place so your concealer doesn’t slide around, even if you aren’t in the mood for a full coverage face. It’s also great with a flat top powder brush to just even out your skin tone. And for the record, because I know it’s a pricey powder, Revlon ColorStay Pressed Powder does essentially the same thing. I just happened to have this floating around, and it’s more than half gone, so I’d like to use it up. I hate waste.

MILANI BAKED BLUSH IN ‘LUMINOSO’ ($8)

img_9426Almost everyone here knows about Milani Baked Blush in ‘Luminoso’ – and if you don’t, crawl out from under your rock, run to your nearest CVS, and buy it! All of the Milani Baked Blushes are nice, but most I find to have chunky glitter in. This one though….*le sigh*….not only is it a drugstore dupe for a high end brand, but it’s got this incredibly natural peachy pink glow with the slightest champagne shimmer in it. It’s like having your blush and highlight all in one. It’s like heaven shined down on your cheeks, from a little round, golden compact. This is one of those staples that absolutely everyone needs in their collection, whether you’re a drugstore goddess or high-end hoarder.

BUXOM FULL ON LIP CREAM IN ‘ROSE JULEP’ ($20)


 This is a new purchase, which I really struggled with before committing and placing my order, for a few reasons; #1. $20 for a lip gloss? Really? #2. It’s hard to pick a shade online – but thanks to a swatch by Kathleen Lights on YouTube, I took the plunge, and I’m glad I did. I do enjoy Buxom’s lip products; they have a wonderful, refreshing, cool, tingly feel on the lips, which I can’t wait to use during the warm brutally hot summer months. The colors really are gorgeous, this shade in particular being a rosy pink shade that is very close to my own lip shade, so it’s perfect for a minimal makeup day. And they last. They’re sticky, but not uncomfortably so, which helps them stay put, which in turn means you’re not reapplying every hour and zipping through a tube of this stuff in a month.
Really, go buy one. They’re awesome.


There you have it guys!! What are some of the things you’ve been loving this month? Have you tried any of these? Leave me a comment and let me know! I love to hear from you!

Come follow me around social media!
Twitter, Pinterest & Instagram : @dlynnesposito
Facebook : Affordable Gorgeous
Snapchat : dlynnesposito

And feel free to reblog this post and share my social media with your friends! Your support means so much!

LOTS OF LOVE!!
img_9363-3

REVIEW – MAKEUP GEEK CONTOUR POWDERS

 Hey guys! It’s time for another review/swatch/demo of a new product that was produced by one of my absolute favorite brands – Makeup Geek!

That’s right, we’re talking about the Makeup Geek Contour Powders!!!

When I heard these were launching I was so excited to try them, and when I saw the video showing the shades, naturally my excitement grew and grew!

Here’s what Makeup Geek has to say;

All About Contour Powders:
Super soft and buttery smooth, Makeup Geek Contour Powders blend like a dream and have been specifically designed to accommodate skin tone extremes and everything in between. From the lightest of light, to the deepest of deep, we have your shade. Choose from a complete lineup of 8 unique shades—four with warm undertones and four with cool undertones.

 There are eight shades total in the line, ranging from porcelain to deep, in both cool and warm undertones. I ordered ‘Breakup’ which is for cool, porcelain skintones, and ‘Infidelity’ which is for cool, fair skintones. Of course, this is just to start – with time will come the rest!

These retail for $10 each, which is a fabulous price for the quality (which we’ll discuss, of course!) or you can purchase a bundle of all eight shades for a discounted rate of $65, perfect for the freelance artist with a large variety in their client base!

If you want to know more, keep on reading!


PACKAGING


 These contour powders are sold in individual pans, which are meant to be popped into a magnetic palette, like a Z Palette. They come in Makeup Geek’s standard single-pan envelope, which is a black, white, and hot pink design with a clear window allowing you to see the shade of the product inside. When you open the envelope, out slides a black, folio style protective sleeve where the product is housed.

FORMULA


Top : Breakup (cool porcelain); Bottom: Infidelity (cool fair)

 Like buttah! No, seriously, these are insanely creamy and smooth to the touch! There is a little bit of fallout, but to be fair, it is a powder – you’re going to have fallout to some degree, it’s inevitable. They’re probably a medium on the pigmentation scale, but that’s a good thing – it means they’re buildable, and I don’t know about you, but I personally am not a fan of an overly intense contour!

APPLICATION & WEAR

I’ve worn both shades separately, and I’ve mixed them, and of course I’ve tried them with a bunch of different brushes, all which give a varied result. My favorite way to apply them is with either an e.l.f. Small Tapered Brush, or a Morphe M438.
When I want a very natural, daytime appropriate contour, I like to use ‘Breakup’, which is the shade formulated for cool, porcelain skin, on the e.l.f. Small Tapered Brush. It gives a beautifully blended finish that looks like you have perfectly placed, God-given shadows on your face.
When I’m feeling a bit more dramatic, I like to use the shade ‘Breakup’ as more of a bronzer, and then create a sharper contour using the NARS ITA brush with a little bit of ‘Infidelity’ layered over it. Check out the photo below to see what they actually look like on the skin; this photo is from a recent tutorial, so click here if you want to check it out!

img_0389

Overall Rating : 5/5


You guys, these contour powders are absolutely incredible! I can only hope that there are highlight powders following suit!
Have you guys tried these yet? What are your thoughts? Leave me a comment and let me know! I love to hear from you!

Come follow me around on social media!
Twitter, Pinterest & Instagram : @dlynnesposito
Facebook : Affordable Gorgeous
Snapchat : dlynnesposito

And feel free to reblog this and share my social media with your friends! Your support means so much!

LOTS OF LOVE!!
img_9363-3

MOTD – IT’S A RED LIP KIND OF DAY 2/27/16


FACE

Fruit of the Earth 100% Aloe Vera Gel (primer)
L’Oreal Infallible Pro-Matte Foundation (101 Classic Ivory and 102 Shell Beige)
Urban Decay Naked Skin Weightless Complete Coverage Concealer (Fair Neutral and Light Neutral)
Rimmel Natural Bronzer in Sun Light
L’oreal True Match Blush in Innocent Flush
Makeup Geek Contour Powder in Breakup
BECCA Shimmering Skin Perfector Pressed in Opal
Urban Decay Chill Makeup Setting Spray

EYES

Morphe Eyeshadows in Silk and Matte
L’Oreal Voluminous Mascara in Brown Black

BROWS

Anastasia Beverly Hills Brow Definer in Taupe
Anastasia Beverly Hills Clear Brow Gel

LIPS

Revlon Colorburst Lip Butter in Red Velvet

REVIEW – H&M GOSSAMER LIP STAINS

 Hey guys! I’m back to day with another review, on another lip product; are you surprised?
I didn’t think so.

A few months back I noticed that H&M stores had launched their own of  beauty products, and naturally, I was excited! We all know them for their inexpensive, fashion forward yet still practical clothing, but now makeup?! Yes please!!
Upon browsing around the display, I found these H&M Gossamer Lip Stains ($10/each) and immediately went on a swatch-fest! Two of the shades I fell in love with were ‘Gauvy Mauve’ and ‘Storyteller’, both very natural, neutral ‘MLBB’ -ish, but go figure, they were sold out in those two shades.
So I waited….
And waited….
And waited.
And this past weekend, both were back in stock, so I grabbed them.

But before I give it all away, let’s see what H&M says about their product;

Lightweight lip stain formula that dries quickly for a soft, sheer finish. Glides on easily, leaving lips hydrated with elegant color. 0.26 fl. oz. How to use: Apply on clean lips either alone or after lip primer.

Let’s get started!


PACKAGING


 First there’s the basic white and black box with a color indicator sticker on the outside. No big, flashy deal. When you open the box, there’s a black tube with a clear window at the bottom, which allows you to see the color of the product. The tube itself says ‘Gossamer Lip Stain’ and the H&M logo is printed on the clear window. The twist off black top has a doe foot applicator that’s rather soft and picks up the ideal amount of product. The packaging itself has the appearance of a higher end product, without the price.

FORMULA


  On initial swatch, these are very glossy, but after they’re allowed to set a minute, the stain really stays put. It’s a rather pigmented stain, with a medium opacity, which I appreciate. One pass gives you the color payoff you need.
The photos above are in both natural light (on the left) and with flash in indoor light (on the right).

APPLICATION & WEAR

Ok, so this is where things get a little…tricky.
When you swatch it on the back of your hand, this looks like the ideal lip stain; glossy at first, pigmented but not too much so, and the stain stays put.
But when I applied it to my lips, it seems to pill and gather around a little dryness around the inner rim of my bottom lip.
Now apparently, all beauty sales are final at H&M, which would have been nice to know before purchasing (it’s printed on the bottom of your receipt, but by then it’s too late – can we get a sign?! Literally, on the display would be nice!) whereas other stores allow you to return a product you’re unhappy with. Believe me, I tried.
I brought them home (because I couldn’t return them) and tried to use an e.l.f. Lip Exfoliator ($3/elfcosmetics.com) before application. Unfortunately that didn’t do much better.
Then I tried a lip primer, more specifically the NYC City Proof Twistable Perfecting Lip Primer ($3/Walmart), which helped a little bit with application, but I feel like you get more longevity and better wear time from a stain when it actually stains your lips and not a lip primer.
Speaking of longevity, this product has like, none, when applied to the lips. Which I don’t quite understand because swatches on my hand will stay for almost two days – but it pulls a Houdini on the lips! Poof! Gone!

Overall Rating : 2/5 – and it’s only getting the ‘2’ because I like the colors.


Man oh man do I wish I could return these; I know one thing, I don’t think I’ll be purchasing any more of their beauty products, and primarily for the return policy – I like to know that if something doesn’t work for me, I can bring it back. And I like to know, ya know, before I buy.
Have you guys tried these? What about other H&M beauty products? What are your thoughts? Leave me a comment and let me know!

Come follow me around social media!
Twitter, Pinterest & Instagram : @dlynnesposito
Facebook : Affordable Gorgeous
Snapchat : dlynnesposito

And feel free to reblog and share my social media with your friends! Your support means so much!

LOTS OF LOVE!!
img_9363-1

SPRINGTIME PINK MAKEUP TUTORIAL

 Lately with all the spring trends popping up in magazines and on the internet, I’ve been totally feeling spring makeup vibes! Maybe I can entice it to make an early appearance by using spring colors, what do you think?

In any event, on a recent Pinterest binge, I came across this board, #glossierpink, and it’s from the company Glossier, who’s primary focus is on skin care first, and makeup second. They have a great selection of beauty products created based on feedback from women like you and me, which is really cool. But all the pinks, you guys; they inspired me. They had the most gorgeous, springtime blush tones, and I knew that I wanted to build a look around all pinks!

So if you want to see how I created my #glossierpink look, just keep reading!


Starting with the skin, I’m going to be priming my face with Revlon PhotoReady Perfecting Primer, to smooth any lines and fill in my pores. Once that sets into the skin, I’m going in with Maybelline Fit Me Stick Foundation in 11o, and then blend it out with a flat top kabuki brush (mine is no-name, but it’s the same as a Sigma F80).

Then I’ll conceal and highlight under the eyes, the forehead, down the center of the nose, the cupids bow, the sides of the nose, and my chin, using NARS Radiant Creamy Concealer in ‘Vanilla’, and blend it out with a damp sponge, and immediately set the concealer with ‘Banana’ from the Anastasia Beverly Hills Contour Kit and a Morphe M438 brush.

Now I’ll be contouring, using my new Makeup Geek Contour Powders. First I’m going in with ‘Breakup’, which is made for porcelain skin with cool undertones, with a NARS ITA brush. Then, for a slightly more sculpted and dimensional look, I’ll add a little bit of ‘Infidelity’, which is a cool toned shade for fair skin, on an e.l.f. Small Tapered Brush, concentrating it more towards the ears, where I want my contour the darkest. Next, using my Real Techniques Blush Brush, I’m going to apply L’Oreal True Match Blush in the shade ‘Innocent Flush’ to my cheeks. To highlight, I’m using my Physician’s Formula Mineral Glow Pearls (which are no longer ‘pearls’, see my DIY post here) for a soft, radiant, pink glow, on the cheekbones, tip of the nose, and cupids bow.

Now onto the eyes! If you haven’t already primed your eyes with your concealer (like I usually do) you can do that, or use your favorite eyeshadow primer. I’ve been loving my LORAC Behind The Scenes Eye Primer that came with my Pro Palette 1 & 2 – that stuff grabs on to your shadows and they don’t budge!

So for this look, I decided to use all Morphe eyeshadows. And you guys, for $2.29 eyeshadows….they’re gorgeous. You know by now my love for Morphe products. I don’t have to tell you. I’m going to start by picking up the shade ‘Swine’, which is a light, neutral mid-toned brown transition shade, and dust that in the crease using a Morphe M433 brush. Back and forth, in windshield wiper motions, and then small circles, focusing most of the product on the outer corner.

Now, I’m going to pick up the shade ‘Peekaboo’, which is kind of a mauve-y pink shade, and using the same brush, put the right over the first color. Back and forth, buffing it in and making sure there are no harsh lines.

Next, I’ll take the shade ‘Pretty In Pink’ (a matte, cotton candy pink) on a Morphe M330 brush, and apply that on top of the first two, keeping it very low in the crease.

Finally, using my finger, I’ll pat a little ‘Wink For Pink’, a shimmery, pearly baby pink, onto my lid, and then go back to the M330 with no additional product on it, and just buff out the line between the shimmery shadow and the ‘Pretty In Pink’.


Now that your shadows are on, go ahead and add some winged liner (or not, totally up to you!). I did a thin wing (see the photo below) with Maybelline EyeStudio Lasting Gel Liner in ‘Blackest Black’ and a Morphe 160 1/8 brush. Check out my winged liner tutorial here.

 For the lower lash line, I’m going to pick up a little of the shade ‘Treasure’, a slightly shimmery warm brown, on a Morphe M432 brush, and wiggle that into my bottom lashes but only on the outer third of my eye. Then I’ll blend it out by taking some ‘Swine’ and ‘Peekaboo’ on an M169 pencil brush and run it back and forth along the lower lash line, right over ‘Treasure’.

Now I’m going to highlight the inner corner and brow bone with that same Physician’s Formula highlight that I used on my cheeks on a clean M169, and apply a few coats of Covergirl LashBlast Clump Crusher Extensions Mascara in ‘Very Black’ to my top and bottom lashes.

Don’t worry, we’re almost done! But we absolutely can’t forget the brows – after all, they frame the face, and help to pull the whole look together. I’m going to fill them in with my NYX Micro Brow Pencil in ‘Taupe’, and set them with the Anastasia Beverly Hills Clear Brow Gel.

Finally, for the lips, I slightly over-lined them with NYX Retractable Lip Liner in ‘Nude Pink’, and then applied Revlon Colorburst Lip Butter in ‘Pink Lemonade’ over the top. Give yourself a bath in some setting spray; I used Urban Decay Chill Makeup Setting Spray, and we’re done!


Wow, that was a long one! But for someone who usually sticks to neutral shades and brown tones, I’m really feelin’ these pink tones! I hope you guys enjoyed this look! Leave me a comment below and let me know!

Come follow me around social media!
Twitter, Pinterest & Instagram : @dlynnesposito
Facebook : Affordable Gorgeous
Snapchat : dlynnesposito

And feel free to reblog this post and share my social media with your friends! Your support means so much!

LOTS OF LOVE!!
img_9363-2

REVIEW – BECCA x JACLYN HILL SHIMMERING SKIN PERFECTOR ‘CHAMPAGNE POP’

 I did it! I finally managed to get my hands on some ‘Champagne Pop’!!

Unless you’ve been literally living ‘off the grid’ – and I’m not even sure that would keep you in the dark – then you’ve heard of this product. On YouTube, Pinterest, Google, pretty much every blog or magazine out there has reference this product in some way, shape, or form.

This was a collaboration with BECCA Cosmetics by YouTuber and professional makeup artist, Jaclyn Hill. What it is, is the most beautiful, buttery smooth pressed powder highlight I’ve ever felt in my life, and her custom created shade is exactly that; a soft, white-gold with peachy pink undertones, that looks like powdered Cristal in a compact.

While BECCA is available at JC Penny, ULTA, Sephora, and online at www.beccacosmetics.com, this shade in particular is exclusive to Sephora. If you don’t have a Sephora near you, many JC Penny stores now have a Sephora inside them.

Jaclyn Hill is a former MAC Makeup Artist and freelance artist from Tampa, Florida. Starting YouTube approximately three to four years ago with a cheap camera and a desk lamp, she built one of the most successful YouTube careers around. Her quirky, fun, high-energy style and positive outlook on life are what really draw you in, and I’ll admit, she’s not only my favorite YouTube beauty ‘guru’, if you will, but a huge inspiration.

Now that I’ve had my fan-girl moment, let’s talk about the product itself; here’s what BECCA has to say:

What it is:
A creamy powder highlighter that absorbs and reflects light for the ultimate natural glow.

What it does:
Find refined luminosity in any light. This bestselling formula is enriched with ultrafine luminescent pearls that absorb, reflect, and refract light so your natural radiance is never lost. Unlike the traditional pressed powder method which simply mixes and compresses dry ingredients, this unique process blends pigments with proprietary liquid binders, resulting in unparalleled, creamy application with balanced color dispersion. Like a compact full of crushed gemstones, the multi-toned, ultra-fine pigment pearls adjust to your skin’s natural undertones for a truly unique glow.

So without further adieu, let’s get started!


PACKAGING


 While most BECCA Shimmering Skin Perfectors come in a black box, this comes in a reflective, gold box with a ‘water droplet’ design, which ties in to the shade name, ‘Champagne Pop’. When you open the box, there is a compact inside, with a silicone-y rubberized finish and domed metal top, with the BECCA name embossed across the top. When you open the actual compact, there is a protective plastic film covering the actual product with again, the BECCA name, and Jaclyn’ signature.

FORMULA


 Upon initial swatch, the formula is incredibly buttery smooth, almost creamy, which I attribute to the ‘liquid binders’ as noted above. The difference that I notice between this and my other shades (Pearl & Moonstone) is that this one seems to contain a visible glitter – not chunky by any means, but more prominent than that of the other shades in the line. It’s not enough to deter me from using the product, though. The swatch above is a heavy swatch, but rest assured, it blends out beautifully. Have I led you wrong yet??

 APPLICATION & WEAR

You guys, I was so excited to use this product that I literally put it all over my face when I got it. And then I stepped back and realized that perhaps I’d gone a little overboard.
While it claims to be a universally flattering shade, I find that on my fair NC15 skin, it can easily appear very golden, almost yellow and unflattering, if I’m not careful.
My favorite way to apply this is with a Morphe M501 brush (yes, the same brush that Jaclyn swears by to highlight, and it works!). I dip my brush in the product, and then tap off quite a bit of excess – back in to the compact, of course – I didn’t pay $38 to highlight my floor and my vanity, after all! Then I lightly dust it over my cheekbones, and down the bridge of my nose, and even a little on the tip of my nose. I also like to bring this up around the sides of my eyes, which give an amazingly gorgeous glow when you turn your head in the light.
Because I’m currently ‘printer paper white’, however, I’ve stashed it away to use during the spring and summer, when I’ve acquired a bit more color. But used sparingly I can still make it work, especially if I’m doing a look that calls for a soft, warm glow.

Overall rating : 5/5


If you have the chance to get your hands on this product, I highly, highly recommend it! It’s often out of stock on Sephora’s website, but you can sign up for an email to let you know that it’s available. When I got mine, I was so excited that I actually ordered two by mistake, but returned one – and the only reason that I returned it, is because….wait for it……it’s no longer limited edition!! BECCA has made this a permanent shade in the collection now, so they will be restocking it regularly!

This product retails for $38 and remember guys, it’s exclusive to Sephora. It’s not even carried on the BECCA website (all the other shades are, however). But it’s abso-friggin-lutely worth the money!

Have you guys tried it yet? What are your thoughts?! Leave me a comment below!

Come follow me around social media!
Twitter, Pinterest & Instagram : @dlynnesposito
Facebook : Affordable Gorgeous
Snapchat : dlynnesposito

And feel free to reblog this and share my social media with your friends!

LOTS OF LOVE!!
img_9363-2

DRUGSTORE MAKEUP KIT FOR BEGINNERS

 Hey guys! Every so often I go through my collection and sort of ‘declutter’. Basically I get rid of things that I’m not using or don’t like or what have you. If I find unused or just barely swatched items that are age-appropriate, I usually pass them on to my step-daughter, who at almost 14, is taking quite an interest in all things beauty.

And the same is true for many girls her age. However, thanks to YouTube, these 13 and 14 year old girls want the expensive stuff – MAC, Urban Decay, Marc Jacobs – and not only is that stuff not always in the budget, but for girls who are just learning, and will likely be wiping off too-heavy foundation or concealer while they perfect their technique, practicing with a $60 foundation or $30 concealer just isn’t, well…practical.

So if you want to see my recommendations for a beginner’s makeup kit, just keep reading!


BB CREAM & FOUNDATION 


 Nine times out of 10, if you’re a young girl, you have pretty great skin. Until you hit those pesky teenage years. Even then, you might be blessed enough to be the girl that has a flawless complexion (I was not). If so, then a BB cream will suit your needs just fine. One of my favorites is the Maybelline Dream Pure BB Cream ($9) (and I’m pushing 30!) which is oil free and contains Salicylic Acid to help treat and prevent breakouts. It offers decent coverage (think sheer but buildable to a light/medium) and is great for evening out your skin tone and covering a bit of redness.
However, if you’re someone who is more comfortable with a fuller coverage, I recommend the Revlon ColorStay Whipped Cream Makeup ($15), which is a medium coverage foundation, perfect for all skin types, and it covers imperfections very well, without ever feeling or looking heavy.

CONCEALER 


 Chances are you don’t have many dark circles to cover, but if you do, color correcting before concealing is super important. NYX Dark Circle Concealer ($6) is great for that, because it corrects and conceals all at once.
If you’re looking for a do-it-all concealer, especially for blemishes or acne scarring, Maybelline Fit Me Concealer ($7) and Maybelline FaceStudio Master Conceal ($9) are both fantastic options. Maybelline Fit Me has a very light, gel consistency, but offers a solid medium coverage, and the Maybelline FaceStudio Master Conceal is a creamier formula, which will make any blemish disappear. Be sure to set these with a powder though, as they can be prone to creasing.

POWDER


 Every girl needs a good translucent powder in her arsenal. It can set your foundation and concealer, make you look airbrushed, and help ease the blending process for any blush or bronzer you plan to use. One of my faves is the e.l.f. High Definition Translucent Loose Powder ($6). It’s inexpensive, and it’s been compared to super fancy, high end brands!

BLUSH & BRONZER


 Blush and bronzer are definitely very important. They bring warmth and dimension back to your face. I’m not talking contouring – that’s way too dramatic for school-aged girls. But a nice light wash of bronzer like Rimmel Natural Bronzer ($5) is great for bringing the life back your skin. It’s matte, waterproof, looks very natural, and it’s not too orangey or warm.
As for blush, one of my absolute favorites that works on nearly every skin tone is the Milani Baked Blush in ‘Luminoso’ ($8). It’s a universally flattering peachy-pink shade that contains a very subtle amount of super fine shimmer. It’s barely detectable, but it just leaves you looking glowy and healthy.

BROWS


 This is all based on personal preference. However for beginners, I would definitely steer clear of any pomades – they’ll look too harsh and overly sculpted, plus they can be tricky to use. I always like to recommend brow powders (or even eyeshadows!) for beginners, as they’re the easiest to work with and the most natural looking. I’ve recently gone back to filling mine in with powder again, using the Salon Perfect Brow Defining Kit ($9), which comes with three brow shades, a highlight shade, a dual ended brush/spoolie, and a waxy crayon to help keep everything in place.

EYE MAKEUP


 Makeup is all about experimentation – and what better way to express yourself than eyeshadow? The one brand I will recommend ten times over is Morphe. Their palettes contain 35 colors each, though there are a few smaller, 12 pan palettes, and they’re around $20! You won’t EVER find a deal like that at your local drugstore! They range from dark smokey colors to neutrals to vibrant hues! And they’re amazing quality – if you’ve been around here with me for awhile you know that I have a special place in my heart for all things Morphe.

Mascara, on the other hand, will be all about individual needs and desired effect. I will say though, that Covergirl’s Lash Blast line is incredible, and Maybelline has some great ones too – my fave from Maybelline is their Volum’ Express Pumped Up! Colossal Volume Mascara ($8), which gives lift, volume, length, and it doesn’t move, all day long. Plus it’s hot pink chubby tube will never, ever get lost in your makeup bag!

LIPS


 Ohhh this is a fun one for me. You know how much I love my lippies. I definitely advise against fully opaque, traditional lipsticks – let your natural beauty shine! I love, love the NYX Butter Gloss ($5) line, especially in the shade ‘Angel Food Cake’ which is flattering on everyone – and they smell like cupcakes!
If you prefer a lipstick, I highly recommend the Revlon Colorburst Lip Butters ($9), or the Almay Smart Shade Butter Kiss Lipstick ($7) (both made by the same company) which is kind enough to break it down by skin tone, helping you find your perfect shade. I’m partial to the shade ‘Nude Light/Medium’ myself – it’s the perfect MLBB (my lips but better) shade! They have nudes, pinks, berry shades, and reds for every skin tone!
If you’re a stain kinda girl (I love them, you don’t have to reapply them after lunch!) then I recommend the L’Oreal Colour Riche Caresse Wet Shine Stain ($8), which goes on like a gloss, and fades to a pretty stain – I believe they might be being discontinued though, so look on Amazon or eBay, or keep an eye out in your local discount/dollar store!


 Ok, so I know it’s a long list – and by no means do I want you to feel like you have to purchase every single product listed – this is merely a guide to get you started! Feel free to tailor it to your needs, wants, and budget!
Have you guys tried any of these products? What are some of your favorite beginner items? Leave me a comment and let me know!

Come follow me around on social media!
Twitter & Instagram : @dlynnesposito
Facebook : Affordable Gorgeous
Snapchat : dlynnesposito

And feel free to reblog this post and share my social media with your friends! Your support means so much!

LOTS OF LOVE!!
img_9363-3

IN SEARCH OF RECOMMENDATIONS!

Hey guys! This won’t be my typical post – I’m actually in search of some advice from YOU guys!

I’ve been having some pretty serious skin issues lately. And I’m struggling to determine what types of products, cleansers, moisturizers, foundation, primer, concealer, etc., might help correct them!

Here’s what’s going on:

In the winter my skin gets dry. In the summer I’m oily.
As of right now, when I apply my makeup in the morning, after cleansing (with Walgreens Oil Free Acne Wash – a generic Neutrogena Oil Free Acne Wash) and moisturizing with Garnier Refreshing Gel-Cream for Dry Skin, my makeup looks ok for about an hour.
After that time, I get oily in my t-zone, but you can still see where my makeup is clinging to dry patches on my nose, on the sides of my nose, and the tops of my cheeks.
So basically I have dry and oily skin at the same time in my t-zone, and normal on my cheeks and jaw.

I’ve tried mattifying primers, hydrating primers, mattifying foundations, hydrating foundations, and every combination you could possibly think of; and I’m at a complete loss.

I do exfoliate twice a week, using Freeman Charcoal & Black Sugar Polishing Mask, and this morning I even tried mixing a little in with my regular cleanser to see if it made any sort of difference. No luck.

Does anyone have a similar skin issue? What do you use? Cleanser, moisturizer, primer, foundation, concealer – help!

Oh! And I’m prone to breakouts, and cystic acne if anything containing silicone is applied to my skin.

Thank you guys so much!

LOTS OF LOVE!!
img_9363-2

CLICK HERE FOR HOT SINGLES!

Single eyeshadows, that is! I know, that was probably mean, huh? But I promise you won’t be disappointed.

Hey guys! I don’t think I could possibly be more excited than I am today! Because…..MY MORPHE SHADOWS AND MAKEUP GEEK CONTOUR POWDERS CAME ON THE SAME DAY! 

Excuse me a moment while I happy dance!

Ok, I’m back. Now that they’re tucked in all nice in their Z Palette home, let’s get to talking about them!


MORPHE INDIVIDUAL EYESHADOWS ($2.29 each)

So most of these shades are new to the line. Not the premium shadows, which they now carry in pans that are roughly double the size of these, and they’re also foiled. These are just the standard size pans, in some of their new shades. Some are existing shades. I didn’t get all of them….yet….just a few.

You guys know how much I love Morphe products. Their brushes, their eyeshadow palettes; they’re definitely like, in the top three of my favorite brands. They’re pigmented, long wearing, buttery smooth, and amazing! Check out the photos below!
BTW, the new shades will be marked with a *.

Natural daylight, no flash

With flash

And now for the actual swatches!

Top Row L to R: Glam Life*, Perfection*, Sweets*, Flipside*, Swine*, Buckle Up*, Treasure*

Second Row L to R: Wink For Pink, Petals, Peekaboo*, Pretty In Pink, Sweet Escape*, Glow For Me

Gorgeous, aren’t they?! Well wait ’til you see what’s next!!


MAKEUP GEEK CONTOUR POWDERS ($10 each)

So next up is something that I’ve been lusting after since I heard they were coming out. These are the Makeup Geek Contour powders – a buttery smooth, long wearing, buildable contour powder in eight shades, ranging from cool porcelain to deep shades. There is literally something for everybody! The pans are $10 each, but for the freelance MUA, they have a bundle of all eight shades for just $65!!

I picked up the shade ‘Breakup’ which is for porcelain skin with cool undertones, and ‘Infidelity’, for fair to light skin with cool undertones. I prefer my contour shades very cool toned, but I think I’ll be picking up a few more of their warmer shades too, just to try them out!

These are pretty heavy swatches, but they can be applied sheer for a natural, daytime look, or built up for a super sculpted, chiseled look.

Top – Breakup (cool porcelain) Bottom – Infidelity ( cool fair)

I absolutely love these already, and I haven’t even begun to play with them! I can tell by the swatches that I’ll be adding more to my collection very soon!


Have you guys tried any of these products? What do you think of them? Leave me a comment below, especially if you want to see a full review or tutorial with anything!

Come follow me around social media!
Twitter & Instagram : @dlynnesposito
Facebook : Affordable Gorgeous
Snapchat : dlynnesposito

And of course, feel free to reblog and share my social media with your friends!

LOTS OF LOVE!!
img_9363-3

REVIEW – MAYBELLINE FIT ME SHINE-FREE STICK FOUNDATION

 I’ve been struggling hardcore with my skin lately – as in, nothing I put on it looks the way I want it to. Most of my trusty, go-to foundation formulas have been leaving me looking cakey and gross.

So today, digging around in my foundation drawer while working on a tutorial (wait ’til you see what it is!), I pick up a long since forgotten about stick foundation; the Maybelline Fit Me Shine-Free Foundation Stick. This retails for right around $9 at most stores, and comes in 12 shades.
Usually I stray away from foundations like this, as they tend to be too heavy, at least for me, however today I needed a little extra coverage and figured “worst case, if it sucks, I’ll just wash it off”.

Before we get started, here’s what Maybelline has to say about their product:

Our first gel stick foundation with an anti-shine core
Fresh gel foundation blends to a natural matte finish
Lightweight powders in the anti-shine core instantly dissolve excess oil

Why You’ll Love It

It’s one-step perfection.
The first of its kind – lightweight gel stick foundation with an anti-shine powder core:

  • Powder core instantly dissolves excess oil.
  • For flawless, shine-free skin and tailor-made natural matte coverage.
  • Easy to apply and great on-the go.
  • Available in 12 oil-free shades.

So how does it perform? Is it worth it? Let’s see!


PACKAGING

img_0415-1
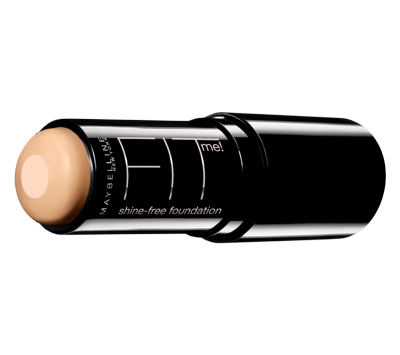
This is a twist up, chunky stick foundation in shiny black packaging. The shade number is printed on the top of the half clear, half black plastic cap, and the name is printed on the side. The cap isn’t terribly durable feeling, and it pops off easily, so I don’t think this is something I would be inclined to carry in my purse for fear of mess, or even ruining the product.


FORMULA

img_0414The formula is surprisingly lightweight, and the ‘anti-shine core’…well, it’s there. I don’t know that it really does anything special. But it’s there.


APPLICATION & WEAR

The way I like to apply this is by literally drawing it directly onto clean skin. I can’t stress clean enough – it’s making direct contact with your skin, and unless you want it to harbor bacteria, make sure you’re face is clean. As an extra sanitary measure, I always wipe of a light layer with a clean tissue after I’m done applying it.

I draw two lines on either cheek, one across the forehead, and one on the chin. This is usually enough for a solid medium coverage finish. Of course, feel free to add more where you need it. It’s recommended to blend it out with your (again, clean) fingers, however I prefer to use a brush, like the Morphe M439 or Sigma F80, spritzed with a light mist of setting spray to help sheer it out and stay put. Once it’s sufficiently blended, I set any areas I tend to crease with a translucent, loose powder.

In terms of wear, after I applied this, I went outside to do some yard work. After about an hour and a half, I came in and colored my hair, washing it out upside down with water running down my face. This stuff didn’t budge! 
It still looked freshly applied, hadn’t caked or clung to dry patches, hadn’t settled into fine lines (I’m almost 30, they’re just there. I’ve accepted it. I call them ‘wisdom wrinkles’). My pores didn’t look like craters on the surface of the moon. All was well.

Now I’m not saying this is advertised as long wearing – because it’s not. However with the right base, application, and setting products, it can sustain itself through yard work, some water, Netflix & chill perhaps?
And they’re usually on sale at ULTA, so you can get one in your skin tone, and maybe another one for cream contouring – these are awesome for that!

Overall Rating : 4/5 (I took off a point for flimsy packaging)


Have you guys tried this foundation? What about others like it? Leave me a comment and let me know!

Come follow me around social media!
Twitter, Pinterest & Instagram : @dlynnesposito
Facebook : Affordable Gorgeous
Snapchat : dlynnesposito
And feel free to reblog this post and share my social media with your friends!
LOTS OF LOVE!!
img_9363-2