REVIEW | COVERGIRL SUPER SIZER FIBERS MASCARA

Screen Shot 2016-06-30 at 3.42.02 PM**I received this product free for review purposes from Influenster – all opinions are 100% my own**

Hey guys!
So I don’t know if I’ve mentioned this before, but I’m a member of a website called Influenster. Basically, it’s a site (and an app!) where you can search for and/or leave product reviews, and every so often, they send out products to members to try out and review in a package called a VoxBox.

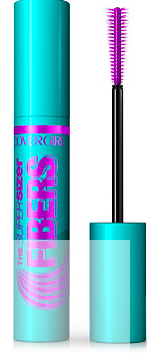
I got one the other day with some products from Covergirl; a new mascara called the ‘Super Sizer Fibers‘ ($6.99/ULTA), and a self-sharpening eyeliner called ‘The Perfect Point Eyeliner’. They eyeliner has been around for awhile, but the mascara is brand, spankin’ new, and I thought I would review it for you guys!

Let’s start with a product description from Covergirl:

Discover 400% more volume and get the look of long, dark, amplified lashes with Super Sizer
Fibers Mascara. Our specialized formula contains built-in fibers for the ultimate false-lash extension effect

So, if you want to know what I thought of this mascara, keep on reading!


PACKAGING

This mascara comes in a pretty, turquoise/teal colored tube with metallic purple writing. When you open it, you’ll find a plastic bristle wand that flares at the end (similar to their other ‘Super Sizer’ mascara) and is flat on two sides with bristles on the opposite sides. It’s designed this was to twist and comb through the lashes when applying.

FORMULA

The formula is unlike the typical Covergirl formula; its very wet. Think like, brand new Maybelline mascara wet. Usually, I love Covergirl mascaras because they’re that perfect balance of not-too-wet and not-too-dry. This might be one that I have to let dry out a bit before I really enjoy it.

APPLICATION & WEAR

Ok, here we go.
As far as application goes, I’ll be honest; I can’t stand this damn brush. It picks up way too much product thanks to its flat sides, and it doesn’t comb through my lashes the way I would like. Perhaps if it were made of traditional bristles versus these obnoxious little plastic ones…..
However, because it tapers closer to the handle and gets thinner, it makes it easy to grab those outer lashes that usually make you smudge your mascara and leave you that accidental smokey eye (sometimes good, sometimes bad).
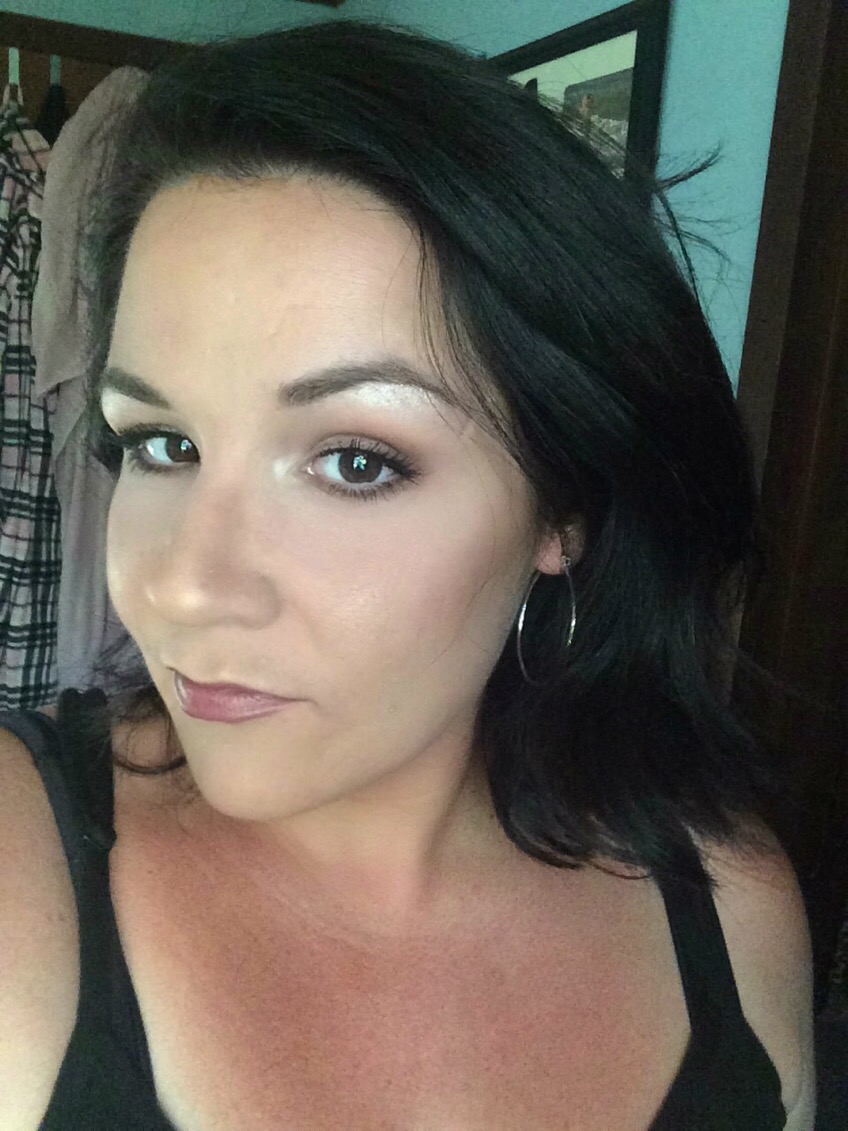
When I tried to twist the wand as the package instructed, all I got were super clumpy, spidery lashes that, while it did lengthen them quite a bit (which I like), I found myself reaching for my metal lash comb to separate them (and poking myself in the eye with it) which was rather inconvenient if you’re someone who like to apply your mascara quickly and run out the door. Overall, it looks nice, but honestly, popping on a pair of falsies is much faster, at least for me. Below is a photo of my bare lashes, and one of my lashes with a few coats of this product:

In terms of wear, I didn’t experience any flaking or smudging, which my sensitive eyes appreciated. And since I have long bottom lashes, many mascaras tend to smudge because they touch the skin under my eyes; this one behaved.
And removal was easy; I simply held a baby wipe over my eyes for a few seconds to loosen the product before wiping it away.

OVERALL RATING : 3/5


You guys, I had really high hopes for this mascara, and sadly, I was kinda disappointed. But I do plan to keep working with it and see if I can get the hang of the brush, or maybe if it’s better as the formula dries out.

Have any of you guys tried this yet? Leave me your comments below!

Come follow me around social media!
Twitter, Pinterest & Instagram : @dlynnesposito
Facebook : Affordable Gorgeous
Snapchat : dlynnesposito

LOTS OF LOVE!!
img_9363-3

MY SUMMER FOUNDATION CHART

Summer is officially here, and while I don’t wear a ton of full coverage during this time of year, it’s nice to be armed with the right shades in the event of a special occasion. In the winter months, I’m the palest of the pale (the lightest shade in any foundation are almost too dark for me!) but in the summer when I’ve spent some time in the sun, it helps to have a few darker formulas on hand – so once again, with the help of findation.com, I’ve listed the formulas and shades that work best for me in the summertime. Check them out to find your perfect matches!


L’Oreal Infallible Pro-Matte 24HR Foundation / 103 Natural Buff

L’oreal True Blend Super Blendable Liquid Makeup / W3 Nude Beige

Maybelline Fit Me Foundation / 125 Nude Beige (concealer in ‘Light’)

MAC Pro Longwear / NC25

Urban Decay Naked Skin Foundation / 3.0 (concealer in ‘Light Neutral’)

Makeup Forever HD Foundation / 120 Soft Sand

Revlon Colorstay Makeup / Sand Beige

Bourjois Healthy Mix Serum Foundation / 53 Beige Clair

MAC Face and Body / C2

It Cosmetics Your Skin But Better CC Cream / Light


What are some of your go-to foundations for summertime? Leave me a comment and let me know!

Come follow me around social media!
Twitter, Pinterest & Instagram : @dlynnesposito
Facebook : Affordable Gorgeous
Snapchat : dlynnesposito

LOTS OF LOVE!!
img_9363-3

REVIEW | HOURGLASS VEIL MINERAL PRIMER

I’ll be totally honest, you guys; I’ve been on the fence about reviewing this particular product for awhile now. Why, you ask? Because it’s so damn, ridiculously expensive.

I’m talking about the Hourglass Veil Mineral Primer ($52/Sephora). I received a sample of it in a Sephora order, and since it’s surrounded by so much buzz, I just had to try it for myself!

Here’s what Hourglass has to say about their product;

What it is:
A mineral-based, water-resistant primer that neutralizes the skin, minimizes shine, and creates a smooth, uniform canvas for flawless makeup application.

What it does:
This clean, satin-finish formula helps keep makeup looking fresh and prevents fading. Veil Mineral Primer also absorbs excess oils and minimizes the appearance of pores by evenly distributing light to help hide and soften the look of skin imperfections and fine lines.

What it is formulated WITHOUT:
– Parabens
– Sulfates
– Phthalates

What else you need to know:
This water-resistant primer is also 100 percent free of fragrance, oil, and gluten.

So, is it really worth all the hype? Keep reading to find out!


PACKAGING & PRICE

In terms of packaging, you’ve got some options. The first is a travel size (great for trying it out!) and it comes with 0.33 fl oz ($18) in a small bottle with a black cap. The second, is a full size at 1 fl oz ($52), in a frosted glass bottle with a deep bronzey colored cap, and then a ‘jumbo’ size, which is 2 fl oz ($72). The travel size and full size both come with a pump, and the jumbo is a squeeze tube. All three have the name of the product printed on the front.

FORMULA 

The formula is an opaque white with a lotion-like consistency, and it has a very similar slip to that of a silicone primer. It almost feels greasy if you rub your fingers together after application, but it dries to a smooth, powdery finish.

APPLICATION & WEAR

Before I get too deep here, if you’re not already familiar, here is some background on my skin type; combination/oily, mostly oily in the summer, with dry cheeks. However, thanks to my skin care routine, I seem to have the oiliness under control and am much closer to normal/dry. I totally recommend this for those with oily skin, or even combination skin, however, if you’re on the drier side, you may want to grab a sample and try it out to make sure it doesn’t cling to dry patches, make you more dry, etc.
In terms of application, a little bit really goes a very long way. I used roughly the size of a small pearl, and that covered my entire face. It’s got almost a sheen to it upon application, which I presume are ingredients that aid in neutralizing redness in the skin (good lookin’ out, minerals!). It glides over the skin and leaves you looking nearly poreless!
Now onto how it wore! Let me start by saying, that I put this to the test on a few different occasions; date night with my husband, where we went for dinner and drinks, outside, at night, in nearly 100% humidity, and for an afternoon of running from a benefit BBQ to a cookout style engagement party, which basically means I got to chase my toddler around in 80 degree weather with a full face of makeup. Sweet.
In both instances, my skin remained matte. And I mean matte. My makeup stayed in place, despite sweating on my upper lip and around my hairline (never fails!). Even dabbing at the sweat, when I got home that night, my makeup looked like I had just applied it, less a few mascara smudges and false lashes that, at that point, were so over it. Color me impressed.

Oh, and in case you were wondering – no, it didn’t break me out at all! My sensitive, sassy skin handled this primer with the grace of Princess Di.

OVERALL RATING : 5/5


Like I said, I was really hesitant to review this primer, considering the hefty price tag that accompanies it. But I’ve told you guys in the past, if something is worth every single, freakin’ penny, that I would let you know! I believe this is that product! Seriously, put a couple bucks away from each paycheck, and go pick up a bottle of this stuff for yourself!

Have you guys tried this primer yet? What are some of your faves? Leave me a comment with your thoughts!

Come follow me around social media!
Twitter, Pinterest & Instagram : @dlynnesposito
Facebook : Affordable Gorgeous
Snapchat : dlynnesposito

And feel free to reblog this post and share my social media with your friends! Your support means so much!

LOTS OF LOVE!!
img_9363-2

MOTD 6.23.16| DATE NIGHT MAKEUP

FACE 

Smashbox Photo Finish Primer Water (as a primer and setting spray)
Hourglass Mineral Veil Primer
L’Oreal Infallible Pro Matte 24HR Foundation (103 Natural Buff)
Urban Decay Naked Skin Weightless Complete Coverage Concealer (Light Neutral)
It Cosmetics Bye Bye Pores Silk HD Micro Powder
Benefit Hoola Bronzer
Makeup Geek Blush (Spellbound)
BECCA Shimmering Skin Perfector (Champagne Pop)

EYES & BROWS

Makeup Geek Eyeshadows:
Peach Smoothie (transition/upper crease)
Cupcake (lower crease)
Shimma Shimma (lid)
MAC Eyeshadows:
Swiss Chocolate (lower crease, blend out lower lash line)
Embark (outer V, lower lash line)
Nylon (inner corner and brow highlight)
Rimmel Lash Accelerator Mascara
Maybelline The Falsies Mascara
L’Oreal Voluminous Mascara
ULTA Brow Tint (Medium)

LIPS

NYX Slim Lip Pencil (Mauve)
Essence Long Lasting Lipstick (Barely There)

MY GO-TO SUMMERTIME GLAM | MAKEUP TUTORIAL 

When I sat down yesterday to get ready for the day, I realized I hadn’t done anything really special in awhile, and I had a fresh new pack of lashes to play with, and well, this is what happened!

If you want to see how I created this super easy, long wearing, natural glam look, just keep reading!


After cleansing and moisturizing, I prepped my skin with some aloe vera gel, and went straight for foundation. Mixing the L’Oreal Infallible Pro-Matte 24HR Foundation and the L’Oreal Magic Lumi Light Infusing Primer on the back of my hand, I dotted it onto my face and blended with a damp Real Techniques Miracle Complexion Sponge. After applying a little of my Urban Decay Naked Skin Weightless Complete Coverage Concealer in ‘Light Neutral’, I again, blended it out with my damp sponge.

Next, grabbing my Kat Von D Shade+Light Contour Palette and a fluffy angled blush brush (mine came from Walgreens on clearance, but I love it!) I used the shade Shadowplay to bronze up my face. Then, with a NARS Ita brush, I very lightly contoured my cheekbones with Subconscious, and used Sombre to contour my nose. I then set my under eye area and t-zone with Lyric, and sharpened up my contour with Lucid, both on a Morphe M438 brush.

Grabbing a Morphe E4, I applied some Milani Baked Blush in ‘Luminoso’ to the apples of my cheeks, and then, because I wasn’t yet visible from outer space, I applied a generous amount of BECCA Shimmering Skin Perfector Pressed in ‘Champagne Pop’ right over the blush, and to the tops of my cheekbones, and a little dab right on the tip of my nose.

I wanted to keep the eyes super simple, so using a Morphe MB23, I applied a little bit of Sombre from the Kat Von D Shade+Light Palette right in the crease of the eye to sort of contour it. Next, I applied a light coat of Rimmel Lash Accelerator Mascara to my top and bottom lashes, and popped on a pair of Salon Perfect Lashes in 614, which have become my new faves! For my brows, I simply ran through them with some L’Oreal Brow Stylist Plumper in ‘Medium to Dark’.

On to the lips! I lightly overdrew them and filled them in with NYX Slim Lip Pencil in ‘Ever’, and then applied some Gerard Cosmetics Color Your Smile Lip Gloss in ‘Madison Avenue’. Give yourself a bath in the setting spray of your choice (I used Makeup Forever Mist & Fix Setting Spray) and you’re all done!


What are some of your go-to products for an everyday glam, summertime look? Leave me a comment and let me know!

Come follow me around social media!
Twitter, Pinterest & Instagram : @dlynnesposito
Facebook : Affordable Gorgeous
Snapchat : dlynnesposito

And feel free to reblog this post and share my social media with your friends! Your support means so much!

LOTS OF LOVE!!
img_9363-3

HOW TO | CLEANING YOUR MAKEUP SPONGES & BEAUTYBLENDERS

So awhile back, I did a whole post about how I clean my makeup brushes (you can check it out by clicking here) and quite frankly, nothing has changed on that front. But recently a friend said to me “I can’t stand using the sponges, they get dirty and I have to throw them out; I never get them clean!”. When I asked how she was cleaning them, she replied “the same way I do my brushes; soap it up and squeeze it, but it’s still stained and gross!”.

Ahhhh…I see what’s going on here. It’s the staining. Yeah, it does look gross.

So I decided to share with her my little trick to cleaning my sponges, and of course, I want to share it with you all too! Because it’s seriously super easy, and something that you probably already have in your kitchen! So let’s get started!


Here’s what you’ll need:

  • dirty makeup sponges / beauty blenders
  • olive oil (extra virgin is fine, that’s what I use!)
  • Dawn dish soap
  • a small dish (I used a clean butter dish)

I always start by dampening my sponges. Run them under the faucet and squeeze a couple times to enlarge them, much like you do before you apply your makeup.

Next, I put a small amount of EVOO (yeah, I’m channeling Rachel Ray here) into a small dish, and some Dawn dish soap on the other side, and press the sponges into the oil first, and then the soap. You’ll probably have to do this more than once, as the sponges will absorb the oil just like they absorb water. Give a couple squeezes to work the oil into the stains. The olive oil helps to loosen the stain, and the Dawn gently deep cleans and breaks down the oil so there’s no residue left behind (so you don’t have to be afraid of this technique, oily folks!).

Finally, squeeze them repeatedly under running water, manipulating the oil and soap through the sponge until the water runs clear.


Depending on how heavily stained your sponges are, you may have to repeat the process twice, even three times. But I can assure you that with a little persistence, they will come clean! The purpose for the olive oil is to help loosen up the stains, much in the way oil based makeup removers help to break down stubborn makeup.

And let’s face it; it sure beats the hell out of replacing your $20 BeautyBlender every month!


What’s your favorite way to clean your makeup sponges? Do you use a DIY, at home method or another cleanser? Leave me a comment and let me know!

Come follow me around social media!
Twitter, Pinterest & Instagram : @dlynnesposito
Facebook : Affordable Gorgeous
Snapchat : dlynnesposito

And feel free to reblog this post and share my social media with your friends! Your support means so much!

LOTS OF LOVE!!
img_9363-3


MORPHE MONTHLY BRUSH CLUB | June 2016

img_9623

Hey guys! It’s that time again!

Time for the unbagging of the Morphe Monthly Brush Club!

If you haven’t read one of these posts before, this is a monthly subscription service, much like an Ipsy or Boxycharm, except instead of getting some sample size cosmetics from brands you may or may not have heard of before, you’re getting at least $30 worth of full size brushes each and every month!
And they’re Morphe brushes, so you know they’re amazing!!
This service is $19.99 a month with free shipping to the US and Canada, and you can sign up yourself at www.liveglam.com – and if you pay a whole year up front, they send you a FREE Morphe 35O Palette – which if you been around on YouTube or the blogosphere or the makeup world in general, you know just how coveted an item that palette is!

So let’s jump in and see what they sent out this month! P.S. they’re all from the Elite Collection!


MORPHE E36

I love this brush for highlighting the inner corner of my eyes, but it’s also great for detailed crease and outer corner work on hooded eyes and smoking out the lower lash line. It’s just tiny enough to be a great multi-use brush, and it’s super soft, which is important (especially to me) when working in a sensitive area like around the tear duct or right under the lashes.

MORPHE E3

This brush is great for setting the under eye area and other areas that you’ve just applied concealer. It’s fluffy, tapered, dome shaped bristles are super duper soft, and it’s almost identical to the Real Techniques Blush Brush (in case you can’t get your hands on it)!

MORPHE E4

This angled brush is perfect for apply your brush, bronzer, or even a soft, natural looking contour. It’s been a long standing Jaclyn Hill fave, so…ya know….it must be pretty great!


For whatever reason, I wasn’t able to locate them on Morphe’s website, but I can tell you that the entire Elite Collection is currently 40% off, so it’s possible that they’re just sold out. Then again, these do look slightly different than the original Elite Collection, so they may be replacing them with a new look! But definitely head over to morphebrushes.com to check out the rest of their brushes, you won’t be sorry!

Have you guys signed up for your monthly subscription yet? Leave me a comment and let me know what you think of it!! I love to hear from you!

Come follow me around social media!
Twitter, Pinterest & Instagram : @dlynnesposito
Facebook : Affordable Gorgeous
Snapchat : dlynnesposito

And feel free to reblog this post and share my social media with your friends! Your support means so much!

LOTS OF LOVE!!
img_9363-3

REVIEW | BECCA X JACLYN HILL CHAMPAGNE COLLECTION FACE PALETTE

img_1657
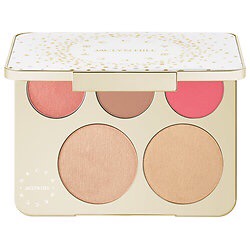
Recently in my ‘May 2016 Favorites’, I mentioned that I had managed to grab the Becca X Jaclyn Hill Champagne Collection Face Palette ($52 / Sephora *Limited Edition*) during the ‘Snapchat Launch’. By that I mean that during an event in NYC, she took to Snapchat to announce that a limited quantity was available that night on the Sephora mobile app, and it could only be found by entering ‘#champagneglow’ in the search bar. Needless to say, I didn’t even finish watching the Snap Story before rushing to open up the Sephora app on my phone, whipping out my debit card, and placing my order (I didn’t even choose complimentary samples or use the 300+ points that I had saved – thats dedication!).

Here’s what Sephora and Becca have to say about the palette :

What it is:
A limited-edition, iconic face palette, featuring five shades of highlighter and blush—in collaboration with Jaclyn Hill, creator of the original Champagne Pop.

What it does:
This palette gives you all the glow you could want—all in one place. This limited-edition, covetable BECCA x Jaclyn Hill Champagne Collection Face Palette features five shades of highlighter and blush to illuminate all skintones, allowing you to customize your looks. Get the iconic Champagne Pop and new shades designed by Jaclyn Hill. It includes two Highlighter shades, two Mineral Blush shades, and a Luminous Blush hue in Rosé Spritz for a pop of color. Mix and match the shades to create endless layers of light and color for your perfect, custom glow. Just sweep the creamy powders across the face, or layer them to highlight your favorite features with universally flattering shades. This palette is perfect for achieving your own, glowing look.

So, is it really all it’s hyped up to be? Let’s find out!


PACKAGING

img_1657This ‘meaty’ palette (Jaclyn’s words, and I agree) feels sturdy and solid. The very front is a glossy white, with a sprinkling of golden dots, said to be similar to popping a bottle of champagne (very JH, if you ask me!), with the Becca name forming a circle around Jaclyn’s name. When you open it up, there’s a huge mirror, the size of the palette, and the three blushes and two highlighters are set into a shiny gold base that is nothing short of gorgeous.

FORMULA

The formula is exactly what you would expect from Becca; smooth, buttery powders with high pigmentation and a beautiful, lightweight, long wearing finish.

APPLICATION & WEAR

Like I mentioned above, these babies are highly pigmented, especially the blushes! Rosé Spritz is a ‘Luminous Blush’, and it’s a gorgeous pink color with a golden shimmer. Amaretto is a ‘Mineral Blush’ in a toasted almond shade, and Pamplemousse is another ‘Mineral Blush’ in a matte, coral pink. I recommend applying these with a very light hand, and blending well.
Both of the highlighters are the classic ‘Shimmering Skin Perfector Pressed’ formula, and apply beautifully as well. Champagne Pop is included in the palette, as well as a new, exclusive-to-the-palette shade, Prosecco Pop, which is a very obvious warm gold. Check out the swatches, all with no primer, and one swipe!

img_1760Left to Right: Rosé Spritz, Amaretto, Pamplemousse, Champagne Pop, and Prosecco Pop.

I’ll admit, I don’t use the palette much because of it’s limited nature, but it was worth every penny to be able to have it in my collection! I have a separate ‘Champagne Pop’ that I’ll be more inclined to use more often knowing that I have another one waiting patiently for me in this palette.

OVERALL RATING : 5/5


I think of every, single palette I own, this is by far my favorite, and the most beautiful one I’ve ever seen! If you haven’t been able to get it yet, it will be re-released on June 16th, 2016, but that’s the last time; once it’s gone, it’s gone forever! 

Will you be picking one up for yourself? Do you already have it? Leave me a comment with your thoughts!

Come follow me around social media!
Twitter, Pinterest & Instagram : @dlynnesposito
Facebook : Affordable Gorgeous
Snapchat : dlynnesposito

And feel free to reblog this post and share my social media with your friends! Your support means so much!

LOTS OF LOVE!!
img_9363-2