ST. PATTY’S DAY MAKEUP TUTORIAL #2

Hey guys!

So while, I have another St. Patty’s Day makeup tutorial coming your way, I thought to myself “why not share the slightly different look that I wore to the parade yesterday?!”

Yesterday, my husband, my son, and myself went to the annual St. Patricks Day parade in New Haven (Connecticut) and had a great time! But the couple days leading up to the parade, I knew I wasn’t the type of person to wear the funny hats, and dress in head-to-toe green; but I knew I would try to create a killer green smokey eye!
Hey, some people dress their body, I dress my face – it is what it is!

In any event, I was actually really impressed with how the look turned out (despite being crazy rushed in the morning – I’m a mom before all else, and well, baby needs to be ready first!) and I wanted to share with you how I achieved my parade-ready look!
SIDE NOTE * It was quite warm out for March, with a touch of humidity, and my makeup did…not…budge!*

If you want to see how I created this look, then just keep reading!


 Working with more pigmented, shimmery shadows than usual, I knew I wanted to do my eyes first. So I started by priming my eyes using the Urban Decay Primer Potion (still working off my little Sephora VIB sample), and then went over my lids and slightly into my crease with my NYX Jumbo Eye Pencil in ‘Milk’, and blended that out with my finger.


 First, I wanted a warm transition shade, so I mixed ‘Beaches and Cream‘ and ‘Peach Smoothie‘, both by Makeup Geek, and dusted that back and forth sloppily into my crease using a Morphe M441 brush.


 They shadows I’m using are samples of Urban Decay singles, I believe, that I received with an ULTA order sometime last year, and never really got around to playing with. So, I started with the shade ‘Mildew‘, which is a shimmery, mossy green shade with the slightest gold reflect. I tried using a Morphe M167 dampened with some MUFE Mist & Fix, but because they’re carded samples, I was having trouble picking up enough pigment, so I ended up packing it on with my finger, from the inner corner, to about halfway across my lid.

Next, I used my Morphe M433 brush to pick up some of the shade ‘YDK‘, which is a shimmery, golden/champagne-y/brown shade, and dusted that lightly over my crease where I laid down my transition shade, and running it just over the edge of the green shadow to soften the line. Then, using a Morphe M169 brush, I carefully started working in the shade ‘Blackout‘ into the outer V, and blending it out with a tapered Morphe M330 brush. You can build on that black color as much or as little as you want – I didn’t want it too dark, but I didn’t want it too light, either. Once I had almost no product left on my brush, I started to very, very lightly drag it over the green in the crease, keeping it very low – #hoodedeyeproblems.

img_9421

Maybelline EyeStudio Gel Liner in Blackest Black

Taking a baby wipe (I ran out of makeup remover wipes), I removed any fallout from under my eyes (and fair warning, there’s gonna be A LOT!) and also sharpen up the edges of the shadow, and then apply some winged liner using my Maybelline EyeStudio Gel Liner in ‘Blackest Black’ (yes, I finally replaced it!) and a Morphe M160 1/8 brush. Click here for my winged liner tutorial!


 Next I applied my foundation. I mixed Revlon ColorStay Foundation for Oily/Combo skin in the shade ‘Nude’ with a pump of the L’Oreal Magic Lumi Light Infusing Primer on the back of  my hand, and applied it with a Sigma F80 brush spritzed with MUFE Mist & Fix.


 For concealer, I’ve been trying out a sample of the MAC Pro Longwear Concealer in NW15, which I applied with my ring finger in a V shape, and blended out with a damp Real Techniques Miracle Complexion Sponge. Then, using ‘Lyric’ from the Kat Von D Shade + Light Contour Palette, I set the concealer under my eyes, and in the center of my face (forehead, nose, chin, etc) with a Morphe M438 brush.


 Back to the eyes – taking a Morphe M432 flat definer brush, I picked up a little bit of ‘Blackout’ and worked that really tightly up against my bottom lashes, matching it up to my winged liner and stopping about halfway. Then, using that M169 pencil brush again, I smoked it out using ‘Mildew’, all along the lower lash line. Finally, I just applied some Rimmel Lash Accelerator Mascara in ‘Black’ to my top and bottom lashes, and popped on some Kiss Blooming Lashes in the style ‘Tulip’.

img_9564I filled in my brows using the NYX Micro Brow Pencil in ‘Ash Brown’, and set them in place with my Anastasia of Beverly Hills Clear Brow Gel.


 I used Physician’s Formula Argan Wear Bronzer and a Morphe M527 brush to warm up the skin, and then applied a light contour to my cheekbones, forehead, nose, and jawline using Makeup Geek Contour Powder in ‘Breakup’ and a NARS ITA brush. For blush, I wanted to keep it kind of low key, so as not to compete with the eyes and make myself look too overdone, so I chose Milani Baked Blush in ‘Luminoso’ on an angled blush brush (mine is from Walgreens) and used my Morphe M501 to apply BECCA Shimmering Skin Perfector in ‘Opal’ to my cheekbones, cupids bow, and the tip of my nose.


 Finally, for the lips, I chose Almay Smart Shade Butter Kiss Lipstick in ‘Nude Light/Medium’, and gave myself a bath in MUFE Mist & Fix. And voila! All done!


 And there you have it! My completed St. Patty’s Day parade look!
Sure, I could have just slapped on some green eyeshadow and walked out the door, but what kind of fun would that have been?! This look would be great if you’re headed out with your friends to a local pub (if you’re old enough!) or if you just feel like being a little extra festive that day!

Most importantly, have fun with it – make it your own! Makeup is supposed to be fun!! And if you recreate this look, tag me on Instagram (@dlynnesposito) so I can see it, too!

Come follow me around social media!
Twitter, Pinterest & Instagram : @dlynnesposito
Facebook : Affordable Gorgeous
Snapchat : dlynnesposito

And feel free to reblog this post and share my social media with your friends! Your support means so much!

LOTS OF LOVE!!
img_9363-3

EVERYDAY ‘MOM’ MAKEUP ROUTINE

Since I’m a SAHM (stay-at-home-mom) my beauty routine is pretty minimal – most days I focus on my regular skin care and not much else. My son could care less what I look like, and my husband is the “you’re beautiful without makeup” guy – bless his heart, he’s a keeper!

But let’s face it, there’s something about putting on makeup that just makes you feel good. For me, it’s about that little bit of “me time” where I get to play around with color combos and finishes and textures and create new looks, which in turn, I get to share with you guys!

When I find that I just need that little pick-me-up, or I have to run out for some errands and I know I’ll be gone for awhile or may run into people I know, it makes me feel good to know that I’ve put that little extra effort in. And that’s what this look is about. It’s very minimal, just a few products, but it really does make all the difference!

So let’s get started!


 So like I said, I always make sure my skin is in prime condition before letting a drop of makeup touch my face! I always cleanse, tone, and moisturize, and then apply a primer. For days where I’m doing absolute minimal makeup, I tend to reach for the L’Oreal Magic Lumi Light Infusing Primer ($13). “But wait, aren’t you oily?” Well, yeah, but hold that thought!


 Recently I’ve been reaching for my Maybelline Dream Pure BB Cream ($6.29), which is oil-free (hence the illuminating primer) and contains salicylic acid, which is great for treating any existing breakouts, as well as preventing future ones. I find that I get a solid light to medium coverage with this, and most days I’m perfectly comfortable just wearing this. But…..


 Since I’m not going for a flawless face (it’s mostly to conceal minor redness) I’m not going to ‘power-conceal’ like I might if I were headed somewhere like out to dinner or a family gathering – I’ll spot conceal where I absolutely need it with my Maybelline Fit Me Concealer ($6.49) in the shade Fair, and touch a little into the inner corner of my eyes to conceal some darkness and brighten up that area. Then I always set the under eye area because I will crease, it’s almost guaranteed. I like the e.l.f. High Definition Under Eye Setting Powder ($3) for this, and just a Real Techniques Setting Brush ($8).


 I’m someone that always, always has to fill in my brows – one is thicker than the other, one is shorter than the other, they’re a hot mess. You can check out my brow routine here. If I don’t have time for a full brow routine, I’ve been reaching for my ULTA Brow Tint ($10) in the shade Light, which makes them look fuller and keeps them under control.


 I don’t go all shadow crazy on days like this, but I will throw on some mascara – I really like the Maybelline Pumped Up! Colossal Volume Mascara ($4.20) lately – and mines almost out so I’m trying to get every last drop out of the tube before I go buy a new one – I don’t know why, it’s so inexpensive I really should just toss it and keep it movin’!


 Since the BB cream isn’t heavy coverage like most foundations, and I’m still able to see my skin through it (freckles and all) I see no pressing need for bronzer and blush and all of that. But I absolutely have to contour my nose (it’s just personal preference and takes me all of a minute) so I use some NYX HD Blush in Taupe ($7) and take it on a super fluffy eyeshadow blending brush like the SOHO Pro Crease Blending Brush ($10.50), and just run it down either side of my nose, across the tip, and blend it up into the inner part of my brows. I also like to blend a little bit lightly into the crease of my eye to contour that too, for a natural look. When you’ve got concealer or foundation or anything on your lids it can make them look too flat and make your eyes look smaller. This techniques just adds a touch of definition.


 Now to get my glow on! Using my Morphe M501 ($8) brush, I pick up a little Wet N Wild Color Icon Bronzer in Reserve Your Cabana ($4) and dust that along the tops of my cheek bones, the side of my eyes, and down the center of my nose. This just makes you look nice and healthy, not overly highlighted.


Photo Credit : Writing Whimsy

 And finally, any neutral color lip gloss, lipstick, anything will do here. I always have the Almay Smart Shade Butter Kiss Lipstick in Nude Light/Medium ($8.01) in my bag – it’s a great ‘my lips but better’ shade and I can literally apply it without a mirror, it’s that easy to use!


That’s it! This is a perfect look for running errands, taking the littles to a play date, even going to lunch with some friends! Or if you’ve got chores to do around the house but you’re feeling a little sassy, this is totally appropriate for that too!

I hope you guys enjoyed this post! Let me know some of your favorite products for busy/minimal makeup days! Leave me comments below!

And please go follow me on Twitter and Instagram @dlynnesposito, and go like the Affordable Gorgeous page on Facebook!

LOTS OF LOVE!

img_9363-3

REVIEW – NYX HD BLUSHES IN NUDE’TUDE AND TAUPE

 I don’t know about you, but I’m always on the hunt for that perfect blush – not too bright, not too pale, not too creamy, not too chalky. It’s tough to find a natural looking, long wearing blush (or even bronzer) that is budget friendly and  meets, let alone exceeds my expectations.

The NYX Cosmetics HD Blush line fits that bill, and for just $6.99 at ULTA and ulta.com. While they’re ALL beautiful colors that compliment any skin tone, I’m here today to talk about 2 specific shades, Nude’Tude and Taupe, which I guess aren’t technically blush in the traditional sense.

When we think of blush, we think peachy, pinky, rosy shades, right? I know I do. But I’ve been using these slightly different. I’ve found the perfect blush for me, which we’ll talk about in another post.

So if you want to know more about these particular shades and their BEST uses, read on!


PACKAGING and FORMULA

The NYX blushes you may be used to seeing come in a small, square black plastic packaging with just a clear window. allowing you to see the color of the product, and then their logo, or label, is printed across the top of the clear window. The actual product itself has sort of a quilted texture. And you can still find some of them like that, in drugstores like CVS and Target, and nyxcosmetics.com. Those are from their ‘Powder Blush’ line, which at first I didn’t realize was different than their ‘HD Blush’ line. These are great and I have a few, but this isn’t why we’re here today.

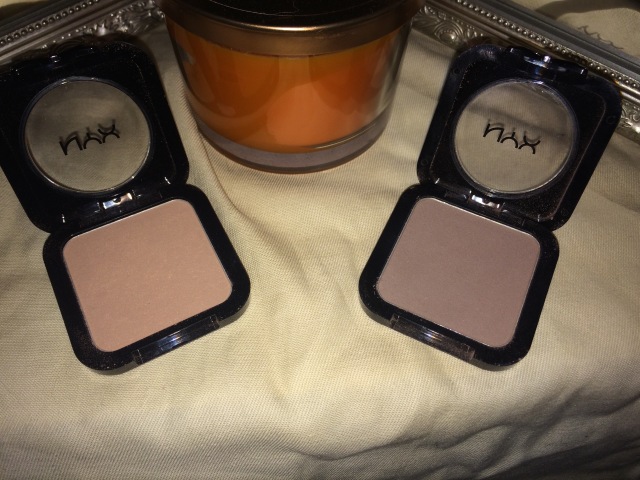
The HD Blushes are in a sleek black packaging, similar to the Powder blushes but a little slimmer, with a black bow accent at the clasp opening, and the product itself is smooth in the pan, perhaps to go along with the ‘HD’ theme. While the ‘Powder Blush’ line looks to contain a lot of shimmer, the HD ones are matte. At least, the ones I’ve seen. They’re really smooth and buttery, though they too, are a powder product. Very pigmented, and when I dip my brush in and tap off the excess, I don’t see as much product go flying into the air as I do with many other drugstore blushes. I’m really impressed by these, to say the least. The HD line comes in 24 shades, but there are two in particular that I want to talk about today.

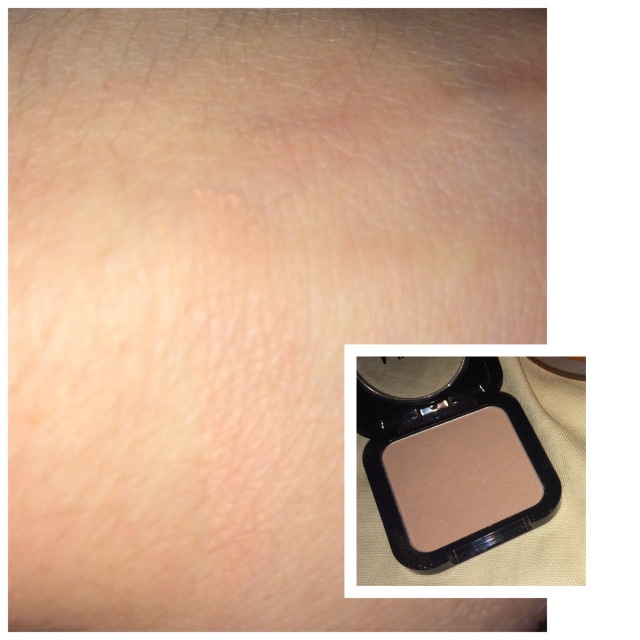
NYX COSMETICS HD BLUSH IN NUDE’TUDE ($6.99)

 I use this shade as a ‘bronzer‘ in the fall and winter, and I use that term loosely. Bronzers are designed to make you look like you’ve been laying out in the sun, like you have a beautiful, natural, warm glow. In the fall and winter, we lose our summer glow. We get lighter, more pale. Then you sit down in the morning to do your makeup, put on your foundation and/or concealer, look in the mirror, and it can be like looking at Casper. And frankly, sometimes blush alone just doesn’t do it for me. I feel like Casper after going on a brisk walk through the graveyard.

Using a fluffy blush brush, like the Real Techniques Blush Brush ($9), and a light hand, I like to apply this to the perimeter of my face first, hitting the temples, the cheeks, and just under the jawline, and then if I feel it really necessary, dust it lightly down the sides of my nose. This just creates a nice warmth to the skin, like you’ve been sitting by the fire drinking hot cocoa. Not bronzy, but alive. You can stop there, or apply your favorite blush and/or highlight over the top.

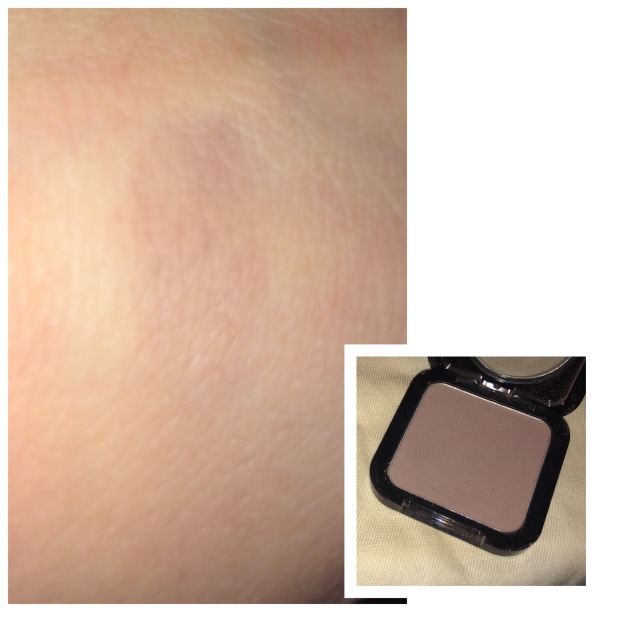
NYX COSMETICS HD BLUSH IN TAUPE ($6.99)

 I remember seeing on YouTube (and for the life of me I can’t remember WHO) someone discussing great, flattering contour shades for fair skin, and this was one of them. If you’re new to contouring, or you’re a contouring vet, you’ll know how hard it is to find a good quality, matte, neutral brown shade with gray undertones for the most natural looking contour. This, my little love bugs, is that shade. I believe it’s still available as part of the ‘Powder Blush’ line as well, though I haven’t tried it to compare the similarities or differences in the formulas.

It’s COMPLETELY matte, not a hint of shimmer in sight, cool, gray toned, and super duper blendable. I use this with the e.l.f Studio Contouring Brush ($6) to sculpt out my cheekbones and then blend upwards to the temples and then just under the jaw. It can be used very lightly for a natural, barely there daytime contour (for that I recommend a Real Techniques Contour Brush from their Core Collection, which can be found here) or built up for nighttime, or any event where you will be photographed, like a prom, wedding, etc. I’ve never had a contour that looked so natural in my whole life.


Overall I don’t think I have a single bad thing to say about these products. I’m actually really excited to try more of them! I would say that these are a total WIN!

Have you guys tried these products? Do you have any favorites for ‘winter bronzing’ or contouring? I’m always looking for alternatives, and I love to hear feedback from you guys! Leave me a comment below!

And if you aren’t already, go follow me on Twitter and Instagram @dlynnesposito

LOTS OF LOVE!

XOXO – DONNA

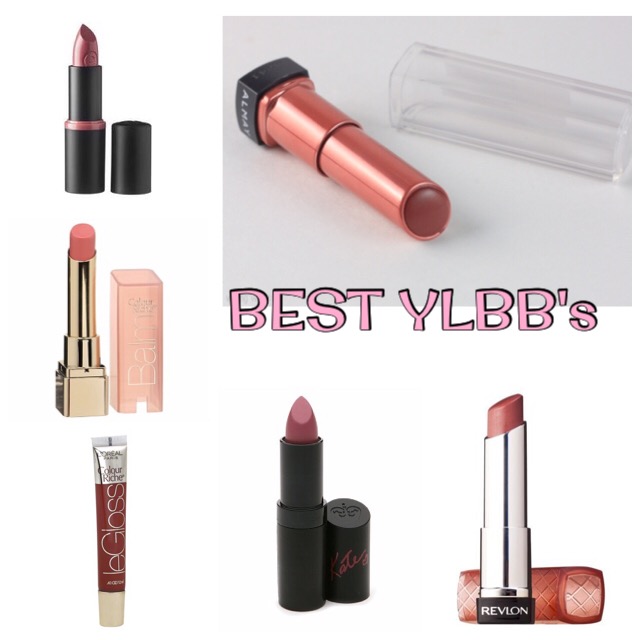
BEST ‘YOUR LIPS BUT BETTER’ PRODUCTS

  With the never-ending choices of lip colors on the market, from nudes to reds, pinks to plums and so on, it can seem like such a daunting task to just find that perfect shade. You know the one I’m talking about – the one that makes people think “what is that lip color she’s wearing? IS she wearing a lip color? I WANT LIPS LIKE HERS!”. THAT, my dears, is known as the YLBB or MLBB (your lips but better or my lips but better) and it seems like it’s almost impossible to find. So I’ve compiled a list of shades from across the board that work on practically ANYONE, from the fairest of the fair, to the deepest, richest skin tones! Let’s get started!


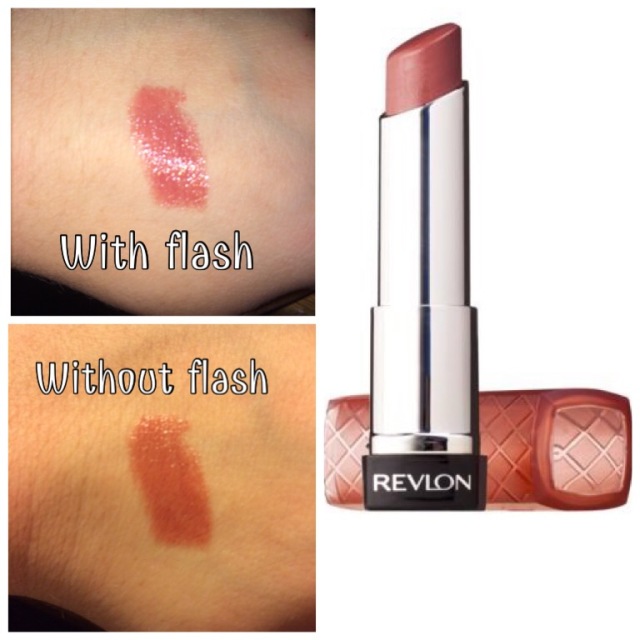
REVLON COLORBURST LIP BUTTER in PINK TRUFFLE ($6/WalMart)

  If I were to go in order of favorites, this would totally be my top pick. I have backups upon backups of this shade, for fear that they’ll discontinue it like one of my other faves, Macaroon, and it LOOKS like Fig Jam may be on it’s way out too! *sad face* But this is the perfect rosey-nude that just makes you look like you have gorgeous, perfectly pink, super hydrated and healthy lips. It’s always with me, and it’s one that I don’t even need a mirror to apply or touch up. It’s my ride or die.

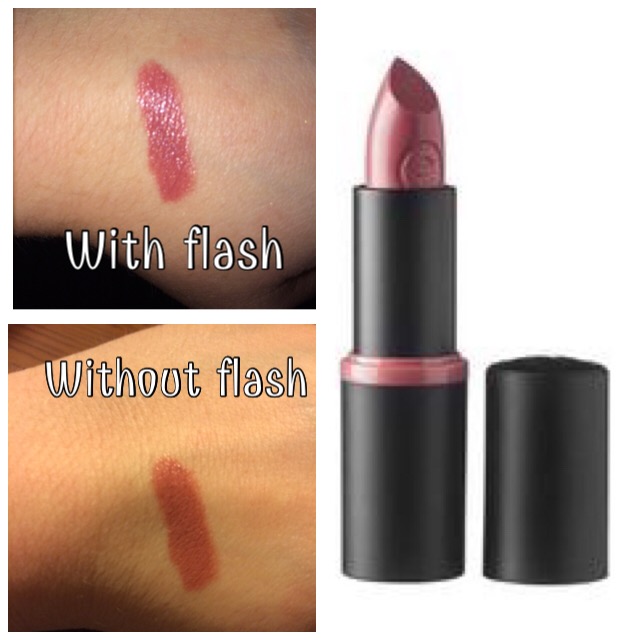
ESSENCE LONGLASTING LIPSTICK in BARELY THERE ($3/ULTA)

  I don’t know that I believe the ‘long-lasting’ claim for this PARTICULAR shade, but maybe I just can’t tell because it almost perfectly matches my natural lip color. I DO have other shades, like ‘I Am Yours’ and ‘Natural Beauty‘ that do seem to last quite some time, so I’ll give it the benefit of the doubt. However for being a long wearing lipstick, I have to say that it’s VERY comfortable on the lips. You know how some can make your lips feel tight and dry? Yeah, not these. I wouldn’t go as far as to call them MOISTURIZING, but they definitely feel very nice.

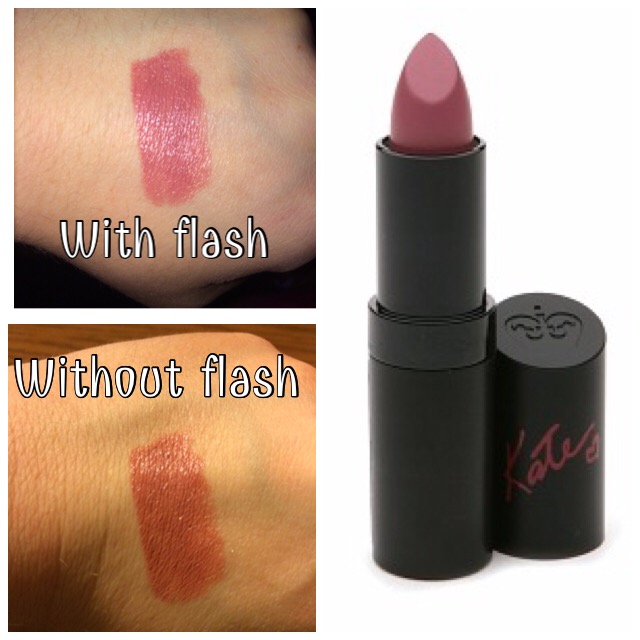
RIMMEL LASTING FINISH by KATE MOSS LIPSTICK 08 ($4/drugstore.com)

  This is a beautiful dusty rose shade, that’s slightly lighter than my natural lip color, but still a great every day hue. I, personally, haven’t found these to be terribly long lasting, and I would highly recommend prepping your lips by exfoliating and maybe using a light balm underneath, especially if you’re dry because it can apply a little on the clingy side, but I still find this to be one I reach for quite often.

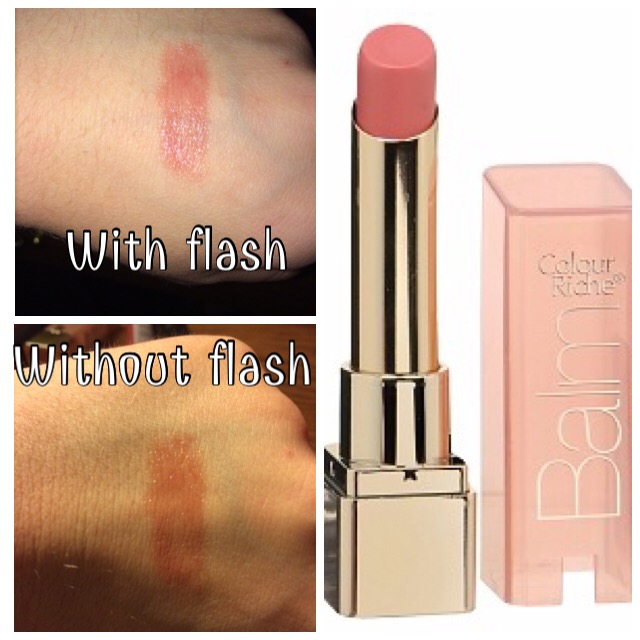
L’OREAL PARIS COLOR RICHE LIP BALM in NOURISHING NUDE ($6/WalMart)

  Yet another shade that I have multiple of – this and Tender Mauve – because they’re just THAT amazing. This definitely leans more to the sheer side, because it is, after all, a tinted lip balm. But my oh my is it beautiful. One thing I don’t really love is that the cap seems to be a little on the flimsy side for my liking, and I’ve cracked a few of them along the way. But when I’m having a no makeup day and just need a little hint of tint, these are ALWAYS nearby.

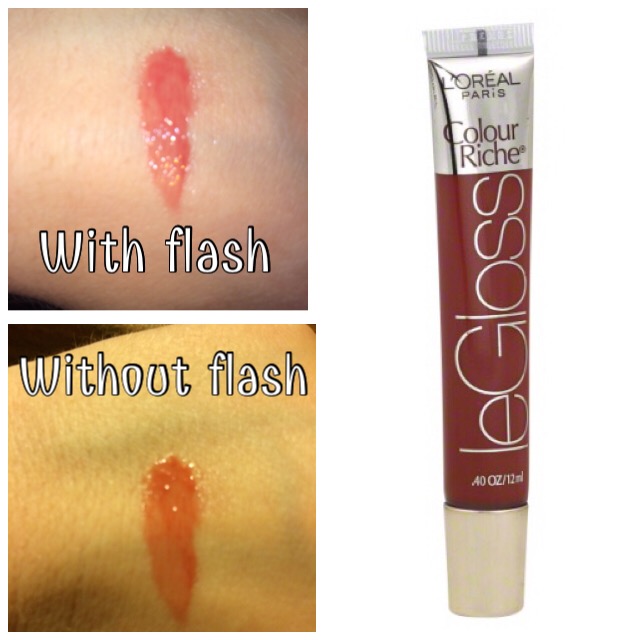
L’OREAL PARIS COLOR RICHE LE GLOSS in REALLY ROSE ($6/WalMart)

  I’m gonna call a dupe alert on this one! While I haven’t tried it myself yet, I’ve seen on Pinterest that this shade is a dupe for NARS Dolce Vita lip gloss. And if I can find a good drugstore dupe, you KNOW I’m all over that! If I had a real gripe about these glosses, it’s that they really have very little staying power. But the shade is just gorgeous, like you bit your lips and put a little gloss on (ya know, the old school way). GAWGEOUS!

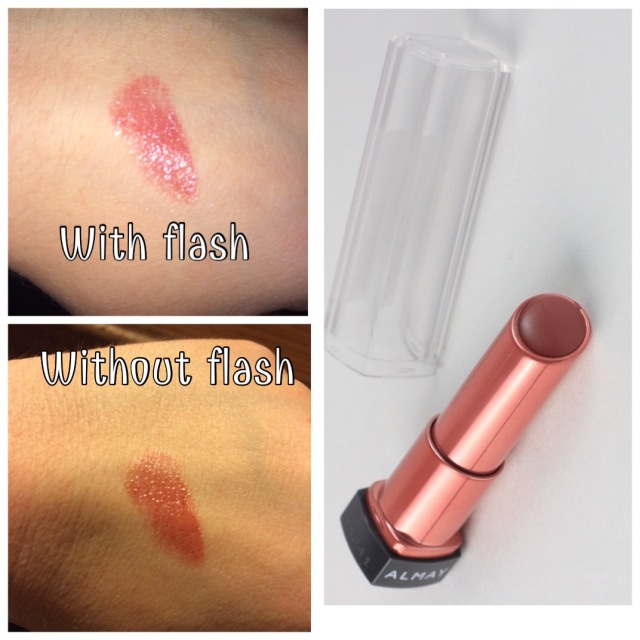
ALMAY SMART SHADE BUTTER KISS LIPSTICK in NUDE LIGHT/MEDIUM ($6/Target)

  These are incredibly similar to the Revlon Colorburst Lip Butters, probably because they’re made by the same company! Right down to the packaging, they’re nearly identical. BUT because Almay took pity on those of us who stand staring at a lipstick display like a deer in headlights, they broke it down to pinks, nudes, berries, and reds according to your skin tone. So light, light medium, and dark all have their own shades of the aforementioned colors. This doesn’t mean you have to stay within those guidelines of course! I fall into the light category, but prefer the shades in the light/medium. They allow your natural lip color to shine through, as they’re a bit more sheer than their Revlon cousins, and more like a balm than a lipstick. But nonetheless, there’s always this shade in my bag!


I really hope this helps you guys! I know for the longest time I was clueless as to how to find that perfect shade, and then I discovered the term ‘YLBB‘ and took to none other than Pinterest! Do YOU have a favorite YLBB? Leave me a comment below!

And don’t forget to follow me on Twitter and Instagram @dlynnesposito.

LOTS OF LOVE AND LIPPIES!

XOXO – Donna

REVIEW : E.L.F Essential Lip Stains

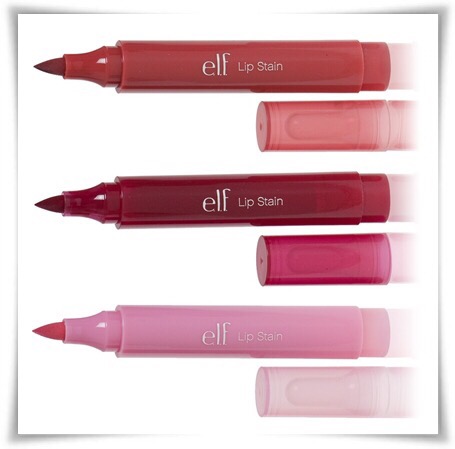
Who doesn’t love inexpensive makeup? No one I know! One of my very favorite brands, E.L.F. ( Eyes Lips Face ) which used to only be available in Target or online and maybe the occasional dollar store, is now available at CVS! When I saw this I was SUPER excited, as I absolutely LOVE their studio brush line as well as some other products. But on either side of their display are some products from their Essentials line, the $1-$2 range of products. Some are great, some are just OK, and some straight up suck. But yesterday something drew me into the Essential Lip Stains, and at $2 a piece I just HAD to try them for you guys! I picked up three, Nude Nectar, Pink Petal, and Berry Flush. So read on for my review!

PACKAGING

It’s your standard felt tip marker applicator that you find in most products like this – while it does have a very precise tip, I find it to be a little TOO stiff, so I sort of lay it on its side for the most even application, which at best is difficult.

L to R : Pink Petal, Nude Nectar, Berry Flush

PIGMENTATION and FORMULA

These little babies are HIGHLY pigmented for a marker stain. I have a few by other brands that I have to make a couple passes to build up the color, which I really like. I like having the option for very sheer, “I just bit my lip” kind of color, and making my way up to a deeper hue. These give a lot of color in just one or two swipes, so be prepared!

The formula itself is quite wet. I find that if I swipe once or twice and then sort of press my lips together it works the best, then I can go back for the Cupid’s bow and sort of make it a bit more defined. It sets quickly, so work fast – and be VERY VERY careful to not get it anywhere else because when I tell you this stuff stains, it STAINS!

Swatches after one full day of constant hand & dish washing

APPLICATION and WEAR

This is where things get a little tricky. When I bought them, I immediately ripped open the nude shade and applied it in the car mirror. It really clung to any little dry spots on my lips, especially the bottom lip, and settled into the lines on my lips. It didn’t feather out, which I appreciated. I would suggest using some sort of lip exfoliating product before applying. But when I tried the pink shade last night I had no problem. I chose the berry shade for this morning (which is VERY berry btw) and it seems to be going strong. I think it’s gonna take a little getting used to. The wear time on these are great though. Usually with any stain I see fading after a couple hours. I applied this at 630 this morning and it’s almost 10am and no fading or transfer at all. Color me impressed !


ARE THEY WORTH IT?

Yes and no – there are so many marker stains out there nowadays – Revlon, NYC, Covergirl – but if you’re looking for something inexpensive to experiment with, or just throw in your bag or even TRAVEL with, then yes. They DO last a good long while on the lips. I would recommend Petal Pink and Nude Nectar for day time any day – they have a great “I’ve been making out for hours” look. The Berry Flush shade would be a GREAT lippie for fall, or even a night out on the town! So go ahead and give them a try!

Or HAVE you tried them already?! Let me know!! Leave me a comment with YOUR opinions! And if you aren’t already, go follow me on Twitter and Instagram @dlynnesposito.

LOTS of LOVE!

XOXO – Donna