MORPHE MONTHLY BRUSH CLUB | JULY 2016

img_9623

Hey guys! It’s that time again!

Time for the unbagging of the Morphe Monthly Brush Club!

If you haven’t read one of these posts before, this is a monthly subscription service, much like an Ipsy or Boxycharm, except instead of getting some sample size cosmetics from brands you may or may not have heard of before, you’re getting at least $30 worth of full size brushes each and every month!
And they’re Morphe brushes, so you know they’re amazing!!
This service is $19.99 a month with free shipping to the US and Canada, and you can sign up yourself at www.liveglam.com – and if you pay a whole year up front, they send you a FREE Morphe 35O Palette – which if you been around on YouTube or the blogosphere or the makeup world in general, you know just how coveted an item that palette is!

So let’s jump in and see what they sent out this month!


MORPHE EE48 (*coming soon*)

Screen Shot 2016-07-01 at 10.03.21 AM

EE48

This natural bristle, small tapered powder brush looks to be great for setting under the eyes or even for a super precise contour! I can’t wait to try it out and see how it stacks up to my beloved M438!

MORPHE EE18 (*coming soon*)

Screen Shot 2016-07-01 at 10.03.35 AM

EE18

This small, round crease brush looks promising for sure! If you’re someone who prefers smaller brushes for the crease (like me, #hoodedeyeproblems), or even using it to smoke out the lower lash line, you’ll love it!

MORPHE M310 ($4.99)

Screen Shot 2016-07-01 at 10.03.42 AM

M310

I have several fan brushes that I’ll be honest, I rarely use. But this is a favorite of Jaclyn Hill recently for applying highlight, so of course, I’ll give this one a go! I really love the M510 for highlighting, which is another natural bristle, goat hair brush, so I can’t wait to try this one too!

MORPHE EE22 (*coming soon*)

Screen Shot 2016-07-01 at 10.03.49 AM

EE22

I don’t know about you, but I can never have too many pointed blending brushes! I love how they place the right amount of color and blend it softly and seemlessly every time! We all know if there’s one thing I hate, it’s harsh lines!

MORPHE M432 ($3.99)

Screen Shot 2016-07-01 at 10.03.56 AM

M432

This synthetic flat definer brush is already a part of my collection, but I love it so much already I was just getting ready to order another one! I’m glad I waited! This is perfect for packing color really tightly along your bottom lashes, and some people even like to use it for a cut crease, though I haven’t tried that! It’s also amazing for carving out your brows with concealer since it’s so thin and flat!


By the way, guys, I mentioned last month that Morphe is discontinuing their original Elite Collection, and they’ve reduced the price even further! Everything is now 60% off! Head over to morphebrushes.com to grab them before their gone!

If you wanna sign up to receive this incredible monthly subscription service, please use my referral link! Just click here : https://liveglam.com/morphe-brushes/

Have you guys signed up for your monthly subscription yet? Leave me a comment and let me know what you think of it!! I love to hear from you!

Come follow me around social media!
Twitter, Pinterest & Instagram : @dlynnesposito
Facebook : Affordable Gorgeous
Snapchat : dlynnesposito

And feel free to reblog this post and share my social media with your friends! Your support means so much!

LOTS OF LOVE!!
img_9363-3

EASIEST NEUTRAL SMOKY EYE & WINGED LINER TUTORIAL

Hey guys!

This is a totally impromptu, unplanned tutorial, but this morning I woke up really wanting to do a full face of makeup, and I knew I wanted a smoky eye and winged liner. By the time I was done, I really loved the way it came out, so I figured I would share with you how I achieved the look! It was super easy to do, and there’s no false lashes involved (unless you want to, of course! Do you, boo!).

If you want to see how I got this look, keep on reading!


Starting with MAC Pro Longwear Concealer in NW20, I’m using this to prime my lids for shadow. It evens out any discoloration on the lids, and creates a tacky surface for your shadows to stick to, and it won’t crease. I applied this all the way from lash line to brow bone before going in with my first shadow.

Next, I used a Morphe M330 to pick up a little bit of ‘Cupcake‘ by Makeup Geek, which is a gorgeous dusty rose shade, and worked that into the crease. Just keep buffing it until there are no harsh lines, and feel free to build it to your desired intensity.

Now, with the same brush I picked up ‘Creme Brûlée‘, also by Makeup Geek, because I wanted to bring back some warmth, and working with pinks alone can be tricky; if you’re not careful, you can end up looking like you have pink eye. I applied this shade right over ‘Cupcake’ using the same buffing motion.

Grabbing a smaller pencil brush like a Morphe M169, I picked up a little bit of MAC ‘Swiss Chocolate‘ and worked that into the outer V of the eye, and dragged it a little bit through the crease for some dimension. If you find that it’s not blending enough, you can buff it out with your fluffier brush like I did.

Taking my Morphe M160 1/8 Angled Liner Brush, and my Maybelline Eye Studio Lasting Drama Gel Liner in ‘Blackest Black’, I created a semi-thin line across the upper lash line, and then a rather dramatic wing (at least for me). If you’re someone who struggles with their winged liner, check out my tutorial by clicking here! Once my wings were even, I applied a couple coats of Maybelline Volum’ Express The Falsies Mascara in ‘Blackest Black’ to my top lashes, and filled in my brows (click here for my brow routine).

Once I have my face makeup in place (you know, foundation, concealer, powder, etc.), I’m going to pick up some more of the ‘Swiss Chocolate’ by MAC on a Morphe M432 (any flat definer brush will work just fine), and press that into my lower lash line from outer corner to inner corner, and then buff it out with ‘Creme Brûlée’ by Makeup Geek on my pencil brush. Then I applied mascara to my bottom lashes, and popped some BECCA Shimmering Skin Perfector in ‘Opal’ under my brows and on the inner corner of my eyes with a Morphe E36.


And that’s it! If you want to see everything I used on the rest of my face, click here to jump to my MOTD post linked to this one!

Come follow me around social media!
Twitter, Pinterest & Instagram : @dlynnesposito
Facebook : Affordable Gorgeous
Snapchat : dlynnesposito

And feel free to reblog this post and share my social media with your friends! Your support means so much!

LOTS OF LOVE!!
img_9363-2

CORAL & PURPLE EYE MAKEUP TUTORIAL

 It’s finally getting warmer! Well, kind of. I mean, it is New England, so there’s always a chance of snow.

But with the warmer weather on the horizon, I’m finally feeling inspired to do spring makeup looks! And I told you guys awhile back that I was looking to step out of my comfort zone and incorporate some color, so that’s exactly what I’m going to do today!

If you want to see how I created this look, then just keep reading!


Because I’m working with such bright colors and such heavily pigmented shadows, I’m starting with the eyes. First I primed them with some MAC Pro Longwear Concealer ($21) in NW15, and then using a Morphe M209 ($2.99), I’m going to set the entire lid with Makeup Geek Beaches & Cream ($6), which is basically the same color as my skin. Not only with it set the concealer/primer, but it will ensure that the brighter shadows I put on top blend much easier.

Taking a Morphe M504 ($6.99), which is a large, pointed blending brush, I’m going to apply some Makeup Geek Mango Tango ($6), which is a bright, matte, coral shade, and buff it into the crease. Back and forth, in windshield wiper motions, focusing most of the pigment on the outer corner, and then working it inward as the product starts to leave the brush.


Next, with a Morphe M330 ($5.99), which is a smaller tapered blending brush, I’m going to apply some Makeup Geek Wisteria ($6) primarily into the outer corner of the crease at first, and then again, bringing it inward as there’s less product on the brush. Keep it low in the crease, so you keep that gradient, transitional effect between the colors. If you find that your lines are too harsh, just buff over the colors with a clean blending brush until they disappear.


Now, I’m going to deepen up the outer ‘V’ using a Morphe Single Eyeshadow in Aphrodite ($2.29). First, I applied it with a Morphe M169 ($2.29) (any pencil brush will do just fine), and then blended the lines and buffed it inward a bit with the M330 that I applied Wisteria with.


Next, using the Makeup Geek Foiled Eyeshadow in Daydreamer ($10), I’m going to pat it on the lid with my finger. I find that these apply best that way, and that I get more color payoff than with any brush in my collection. I apply that from the inner corner outward, about two thirds of my lid.


Using another Makeup Geek Foiled Eyeshadow, In The Spotlight ($10), I again applied it by patting it on with my finger, but this time keeping it to the inner third of my lid. The brighter shade on the inner corner works to brighten the eyes and make them look larger, much like highlighting the inner corners; its the inner corner highlight on steroids, if you will.


Now it’s time to slay that winged liner! Using my go-to eyeliner brush, the Morphe M160 1/8 ($2.99), and my Maybelline Eyestudio Gel Liner in Blackest Black ($9.99), I’m going to create a nice, sharp wing, and keep the line a little on the thin side. I don’t want dramatic liner with this look (although you can if you want to!) because I really want to let the shadows steal the show! If you need a little help with your winged liner, click here for my winged liner tutorial!


I decided to skip falsies today *gasp* and instead, applied some Tarte Opening Act Lash Primer ($22) to my lashes before applying two coats of Maybelline The Falsies Mascara in Blackest Black ($6.99). Then, using a Morphe E36 brush, I applied some Makeup Geek Shimma Shimma ($6) and MAC Nylon ($6) to the inner corner and brow bone for a nice, soft highlight.


For the bottom lash line, I applied some Makeup Geek Wisteria to the outer half, and Mango Tango to the inner half, both with a Morphe M432 Flat Definer brush ($3.99), and then just blended them together with a M169.


And thats it! I know it seems like a lot of work, and you may even be looking at these colors thinking “there’s no way I can pull that off” but trust me, you can!! After all, it’s just makeup, and if you don’t like it, it wipes right off!!

I was never someone who wore anything besides neutrals; browns, beiges, etc. And they were all matte. But I’m really enjoying playing around with color!

Do you guys tend to gravitate towards more neutral looks, or more colorful looks? What are your favorite color combos? Leave me a comment and let me know! I love to hear from you!

Come follow me around on social media!
Twitter, Pinterest & Instagram : @dlynnesposito
Facebook : Affordable Gorgeous
Snapchat : dlynnesposito

And feel free to reblog this post and share my social media with your friends! Your support means so much!

LOTS OF LOVE!!
img_9363-1

A LITTLE POP O’ BLUE MAKEUP LOOK

 Hey guys!

When I sat down to get ready this morning, I knew I wanted to incorporate some color into today’s look; I’ve been getting much braver, and you’ll be seeing some bomb-ass colorful tutorials coming soon!

However, it was pouring rain this morning, so I knew that I didn’t want a full face of makeup, or anything that would run horribly if for any reason I got caught out in the rain. But I managed to get a pretty little pop of color going, and the overall look was super simple to achieve!

If you want to know how I got the look, keep on reading!


Starting with freshly cleansed and moisturized skin, I applied some of my Fruit of the Earth Aloe Vera Gel as a primer because I’m battling a breakout, (read more about the primer here) and it soothes and hydrated at the same time, while controlling oil too.

Next I applied some Maybelline Fit Me Concealer in the shade Fair to all the areas I would normally highlight; under the eyes, the forehead, nose, chin, and cupids bow. I also put a little bit on my eyelids to even out any discoloration there. Spraying my Sigma F80 with some MUFE Mist & Fix Setting Spray, I blended the concealer out. Then I set everything in place with my It Cosmetics Bye Bye Pores Silk HD Anti-Aging Micro-Powder and an e.l.f. Powder Brush.

Using an e.l.f. Angled Blush Brush, I applied some NYX HD Blush in Taupe to the hollows of my cheeks, as well as my forehead and the sides of my nose for a nice, light, daytime contour. Using a different angled blush brush (I think this one was from Walgreens) I applied some of the ULTA Cheek Tint in Sweet Cheeks (discontinued, sorry!) to the apples of my cheeks, drawing it up and back towards the hairline; this helps slim the face and give a lifted appearance. Next, I grabbed my Morphe M501 brush (my ride or die for highlighting!) and my Physician’s Formula Mineral Glow Pearls Powder Palette in Beige Pearl, and applied that to the high points of my face – the cheekbones, above the brow, the center of my nose, my cupids bow, and my chin.

For this look I chose to leave the lids themselves bare. To be 100% honest, I was just too lazy today. But I knew I wanted to do something different and fun, so I decided on a pop of blue on the lower lash line. Picking up my Morphe M432 flat definer brush and a Morphe Single Eyeshadow in the shade B.A.M., which is a gorgeous matte, teal shade, I worked that super tight up against my bottom lashes, from outer corner inward to wear my lower lashes start to taper off. Next, I used a Morphe M169 (any pencil brush will do just fine) and the shade Breakfast at Tiffaneez (also by Morphe) to smoke out the first shade. Finally, using a Morphe E36 brush, I highlighted the inner corner with some MAC Nylon, and blended it inward to meet the blue shades. I also picked some Nylon up on a Real Techniques Shading Brush and used it to highlight the brow bone lightly (it’s very frosty after all). Then I applied a couple coats of L’Oreal Voluminous Mascara, and swiped some ULTA Brow Tint in Light through my brows. Finally, a quick application of Gerard Cosmetics Lip Gloss in Madison Avenue, and I’m good to go!


And that’s it! Super simple, but still super cute! This is a great way to get your feet wet if you’re someone who typically sticks to neutrals (like me) but wants to dabble in the more colorful side of things. Baby steps, my loves…baby steps.
What are some of your favorite ways to incorporate color into your look? Leave me a comment and let me know! I love to hear from you!

Come follow me around social media! 
Twitter, Pinterest & Instagram : @dlynnesposito
Facebook : Affordable Gorgeous
Snapchat : dlynnesposito

And feel free to reblog this post and share my social media with your friends! Your support means so much!

LOTS OF LOVE!!
img_9363-3


ST. PATTY’S DAY MAKEUP TUTORIAL #2

Hey guys!

So while, I have another St. Patty’s Day makeup tutorial coming your way, I thought to myself “why not share the slightly different look that I wore to the parade yesterday?!”

Yesterday, my husband, my son, and myself went to the annual St. Patricks Day parade in New Haven (Connecticut) and had a great time! But the couple days leading up to the parade, I knew I wasn’t the type of person to wear the funny hats, and dress in head-to-toe green; but I knew I would try to create a killer green smokey eye!
Hey, some people dress their body, I dress my face – it is what it is!

In any event, I was actually really impressed with how the look turned out (despite being crazy rushed in the morning – I’m a mom before all else, and well, baby needs to be ready first!) and I wanted to share with you how I achieved my parade-ready look!
SIDE NOTE * It was quite warm out for March, with a touch of humidity, and my makeup did…not…budge!*

If you want to see how I created this look, then just keep reading!


 Working with more pigmented, shimmery shadows than usual, I knew I wanted to do my eyes first. So I started by priming my eyes using the Urban Decay Primer Potion (still working off my little Sephora VIB sample), and then went over my lids and slightly into my crease with my NYX Jumbo Eye Pencil in ‘Milk’, and blended that out with my finger.


 First, I wanted a warm transition shade, so I mixed ‘Beaches and Cream‘ and ‘Peach Smoothie‘, both by Makeup Geek, and dusted that back and forth sloppily into my crease using a Morphe M441 brush.


 They shadows I’m using are samples of Urban Decay singles, I believe, that I received with an ULTA order sometime last year, and never really got around to playing with. So, I started with the shade ‘Mildew‘, which is a shimmery, mossy green shade with the slightest gold reflect. I tried using a Morphe M167 dampened with some MUFE Mist & Fix, but because they’re carded samples, I was having trouble picking up enough pigment, so I ended up packing it on with my finger, from the inner corner, to about halfway across my lid.

Next, I used my Morphe M433 brush to pick up some of the shade ‘YDK‘, which is a shimmery, golden/champagne-y/brown shade, and dusted that lightly over my crease where I laid down my transition shade, and running it just over the edge of the green shadow to soften the line. Then, using a Morphe M169 brush, I carefully started working in the shade ‘Blackout‘ into the outer V, and blending it out with a tapered Morphe M330 brush. You can build on that black color as much or as little as you want – I didn’t want it too dark, but I didn’t want it too light, either. Once I had almost no product left on my brush, I started to very, very lightly drag it over the green in the crease, keeping it very low – #hoodedeyeproblems.

img_9421

Maybelline EyeStudio Gel Liner in Blackest Black

Taking a baby wipe (I ran out of makeup remover wipes), I removed any fallout from under my eyes (and fair warning, there’s gonna be A LOT!) and also sharpen up the edges of the shadow, and then apply some winged liner using my Maybelline EyeStudio Gel Liner in ‘Blackest Black’ (yes, I finally replaced it!) and a Morphe M160 1/8 brush. Click here for my winged liner tutorial!


 Next I applied my foundation. I mixed Revlon ColorStay Foundation for Oily/Combo skin in the shade ‘Nude’ with a pump of the L’Oreal Magic Lumi Light Infusing Primer on the back of  my hand, and applied it with a Sigma F80 brush spritzed with MUFE Mist & Fix.


 For concealer, I’ve been trying out a sample of the MAC Pro Longwear Concealer in NW15, which I applied with my ring finger in a V shape, and blended out with a damp Real Techniques Miracle Complexion Sponge. Then, using ‘Lyric’ from the Kat Von D Shade + Light Contour Palette, I set the concealer under my eyes, and in the center of my face (forehead, nose, chin, etc) with a Morphe M438 brush.


 Back to the eyes – taking a Morphe M432 flat definer brush, I picked up a little bit of ‘Blackout’ and worked that really tightly up against my bottom lashes, matching it up to my winged liner and stopping about halfway. Then, using that M169 pencil brush again, I smoked it out using ‘Mildew’, all along the lower lash line. Finally, I just applied some Rimmel Lash Accelerator Mascara in ‘Black’ to my top and bottom lashes, and popped on some Kiss Blooming Lashes in the style ‘Tulip’.

img_9564
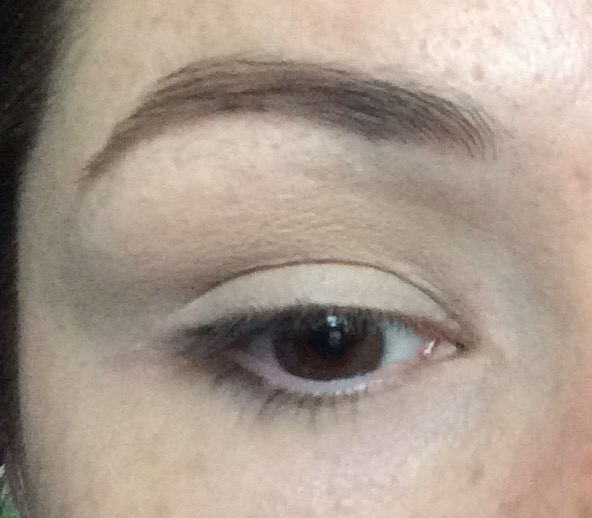
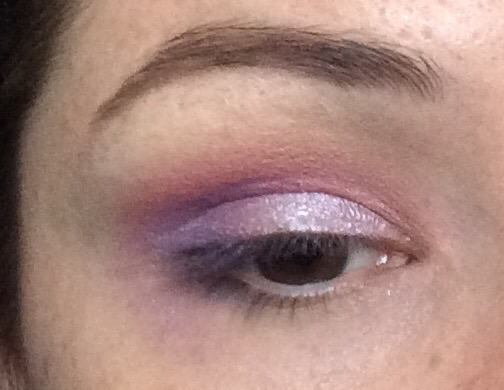
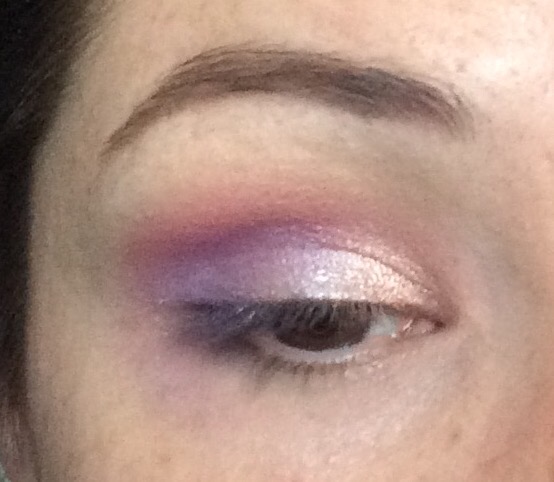
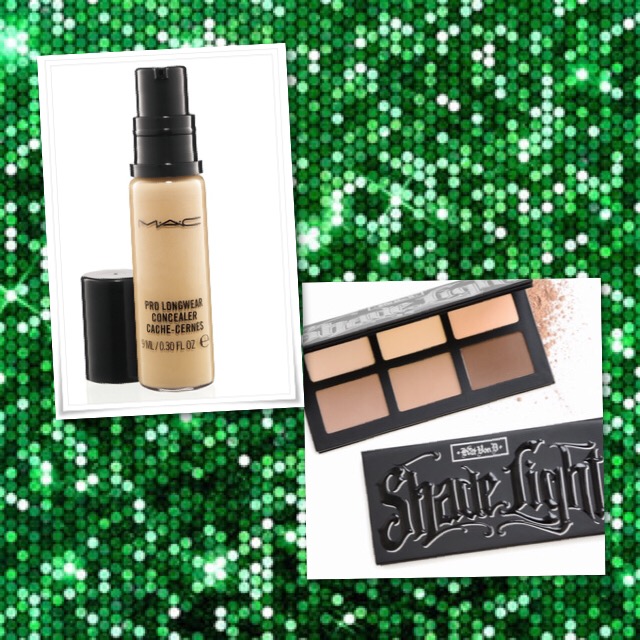
I filled in my brows using the NYX Micro Brow Pencil in ‘Ash Brown’, and set them in place with my Anastasia of Beverly Hills Clear Brow Gel.


 I used Physician’s Formula Argan Wear Bronzer and a Morphe M527 brush to warm up the skin, and then applied a light contour to my cheekbones, forehead, nose, and jawline using Makeup Geek Contour Powder in ‘Breakup’ and a NARS ITA brush. For blush, I wanted to keep it kind of low key, so as not to compete with the eyes and make myself look too overdone, so I chose Milani Baked Blush in ‘Luminoso’ on an angled blush brush (mine is from Walgreens) and used my Morphe M501 to apply BECCA Shimmering Skin Perfector in ‘Opal’ to my cheekbones, cupids bow, and the tip of my nose.


 Finally, for the lips, I chose Almay Smart Shade Butter Kiss Lipstick in ‘Nude Light/Medium’, and gave myself a bath in MUFE Mist & Fix. And voila! All done!


 And there you have it! My completed St. Patty’s Day parade look!
Sure, I could have just slapped on some green eyeshadow and walked out the door, but what kind of fun would that have been?! This look would be great if you’re headed out with your friends to a local pub (if you’re old enough!) or if you just feel like being a little extra festive that day!

Most importantly, have fun with it – make it your own! Makeup is supposed to be fun!! And if you recreate this look, tag me on Instagram (@dlynnesposito) so I can see it, too!

Come follow me around social media!
Twitter, Pinterest & Instagram : @dlynnesposito
Facebook : Affordable Gorgeous
Snapchat : dlynnesposito

And feel free to reblog this post and share my social media with your friends! Your support means so much!

LOTS OF LOVE!!
img_9363-3

MORPHE BRUSH FAVORITES!

So I know recently I posted two separate articles about my favorite brushes  (click here to read about my favorite face brushes, or here for my favorite eye brushes) but today I thought I would bring you a ‘one brand favorite’ brush post.

I’ve fallen head-over-heels in love with Morphe brushes. They’re inexpensive, amazing quality, and I just can’t get enough! So much so, that I’ve joined the Morphe Monthly Brush Club, to have them delivered to me every month!

Today I thought I would share with you some of my faves, and who knows; you might find some that you love too!

Let’s get started!


MORPHE M439 DELUXE BUFFER BRUSH – $13.99

IMG_8956-0This brush is a dream come true for applying liquid or cream foundation! It’s a synthetic brush so it won’t soak up all your product, and because it’s so densely packed, it leaves you with a gorgeous, airbrushed finish! I bought one on HauteLook awhile back, and got another one in my first Morphe Monthly Brush Club package, so you can only imagine how excited I was to have a backup! Before that I was pretty ride or die for my Real Techniques Expert Face Brush ($9) to apply my foundation, and I still love it, but I find myself reaching for this one way more frequently!

MORPHE M501 PRO POINTED BLENDER – $7.99


 This is the absolute best brush I have ever used to apply a powder highlight. It’s fluffy enough that I’m able to deposit the perfect amount of product on my cheek bones and temples, but the tapered point makes it great for putting a little bit on the cupids bow and down the bridge of my nose, and even the brow bone and the inner tear duct! It just goes anywhere!

MORPHE M438 POINTED CONTOUR BRUSH

IMG_9194
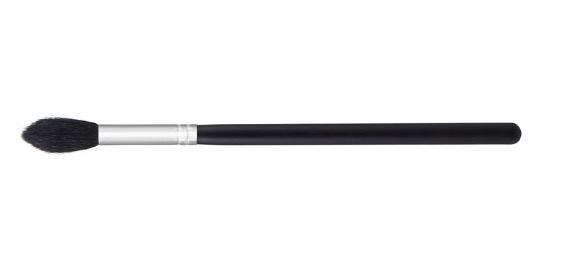
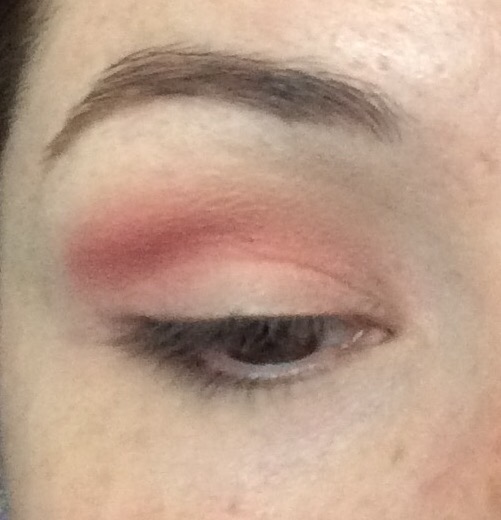
This brush is SO popular that it’s currently out of stock and no price is shown (sorry!!) but I believe it retails for about $10 and  Morphe restocks regularly so it will be back soon! I love this not necessarily for contouring, but more for setting my under eye area with powder, as well as smaller areas of my face like the sides of my nose, and between my brows where I tend to get oily – I’ve been on the drier side lately so I haven’t been powdering my whole face, and this brush is the perfect size for targeting specific areas.

MORPHE M200 DELUXE CREASE BRUSH – $4.99

IMG_8968I love this brush for blending my shadows together and buffing out any harsh lines. It’s not super fluffy, but not super dense either; it’s that nice middle of the road feel, and it blends like a dream!

MORPHE M330 BLENDING CREASE BRUSH – $5.99

IMG_8969
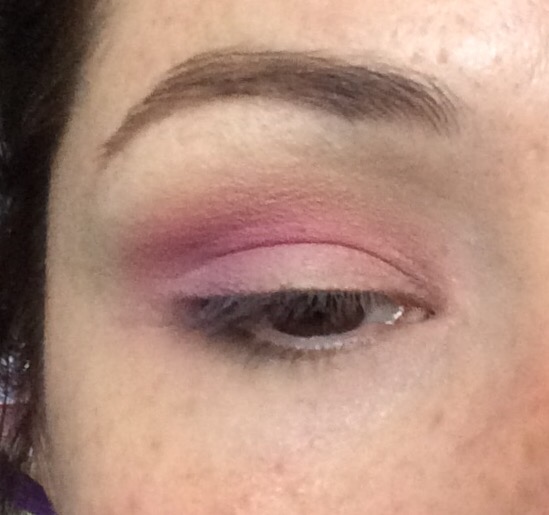
This brush is great for applying your crease shades because it’s tapered enough to really get in there and work from outer to inner corner. The tapered point makes it great for smoking out the lower lash line with a little shadow too, because you can really get up under your bottom lashes without ending up with panda bear eyes! This and the M200 are my go-to shadow brushes!

MORPHE M432 FLAT LINER DEFINER BRUSH – $3.99


 For a long time I had trouble finding a good flat definer brush – they were all just so stiff and scratchy and really hurt my overly sensitive eyes. But this it amazingly soft while being tightly packed, and great for pressing shadows into the lash line for that sexy, smoky look. I also love this for carving out my brows with concealer, because the flat edge just makes them so sharp!

MORPHE M160 1/8 ANGLE LINER BRUSH – $2.99

IMG_8967
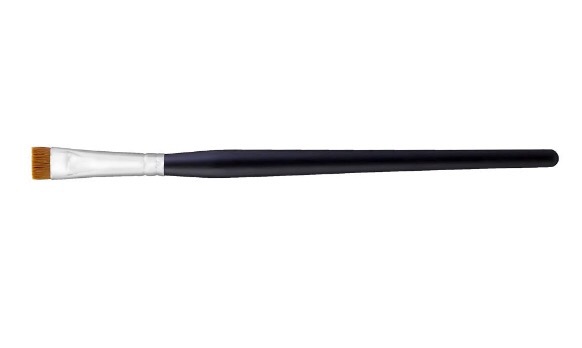
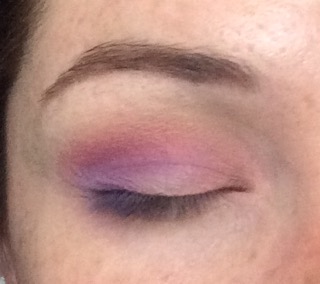
For a long time I struggled with gel liner, hated it even, until I got this brush. It’s amazing what a difference the right tool makes! It’s synthetic and super slim with a fine pointed tip, making it a breeze to get the perfect winged liner! I highly recommend this to anyone struggling with their liner – don’t give up, just get your hands on this! You won’t be sorry!


I’m sure as the months pass and I keep receiving my monthly brushes, I’ll find new faves along the way! But at the present moment, these are brushes that I would without a doubt recommend to anyone! Seriously, if you’re in the market for great quality brushes but don’t want to spend an arm and a leg, check these out! You can purchase all of them at morphebrushes.com!

And if you’ve already discovered Morphe, leave me a comment with some of YOUR faves! I love to hear from you guys, and I love getting your recommendations!

And if you haven’t already, please go follow me on Twitter and Instagram @dlynnesposito, and go like the Affordable Gorgeous page on Facebook!

LOTS OF LOVE!!

IMG_8772-10