CONCEALER 101 : TIPS, TRICKS & RECOMMENDATIONS

Concealer. Oohhh concealer. I think if I had to choose one beauty product for the rest of my life, it would be concealer.

The thing is though, it can be tricky to find the right one for you. Colors, formulas, to color correct or not?
Believe me honey, I know your pain. I have a drawer (yes, a whole drawer) dedicated to concealers. No really, look.

img_1644

Despite the seemingly excessive number of concealers I own, I’m always on the hunt for the “perfect” concealer. A site called ‘Into The Gloss‘ has a fantastic list in which they’ve compiled some of the best concealers around, and I was inspired to pull together a list of my own faves, including color correctors, and how to use them!

So if you want to learn how to find the right one, as well as see some of my personal faves, just keep reading!


WHY DO WE NEED/USE CONCEALER? 

Aside from doing the obvious, which is concealing flaws, concealers are great at other things! I personally use concealer to prime my eyelids for shadow, clean up my brows, winged liner, or lips, highlight, and even cream contour and highlight! Some are thicker, some are thinner, sheer to full coverage; there is literally a formula for every situation!

HOW DO I CHOOSE THE RIGHT FORMULA? 

Choosing the right formula all depends on what you’re looking to do; if you’re working on concealing dark circles or discoloration, you’ll want a gel or serum formula. Especially under the eyes, you want something hydrating, but not too thick so it doesn’t crease.
Similarly, if you’re trying to conceal blemishes, you want something a bit hydrating that doesn’t cling to dry patches or that dry, flaky skin that accompanies a healing blemish (you know what I’m talking about), but is thick enough to actually cover said blemish. And trust me, if there’s one thing I know, it’s covering blemishes, honey! I promise you!

HOW DO I APPLY IT? FINGERS/BRUSHES/SPONGES?? 

Applying different formulas depends on the look you’re going for, where you’re applying it and why, and the formula you’re working with.
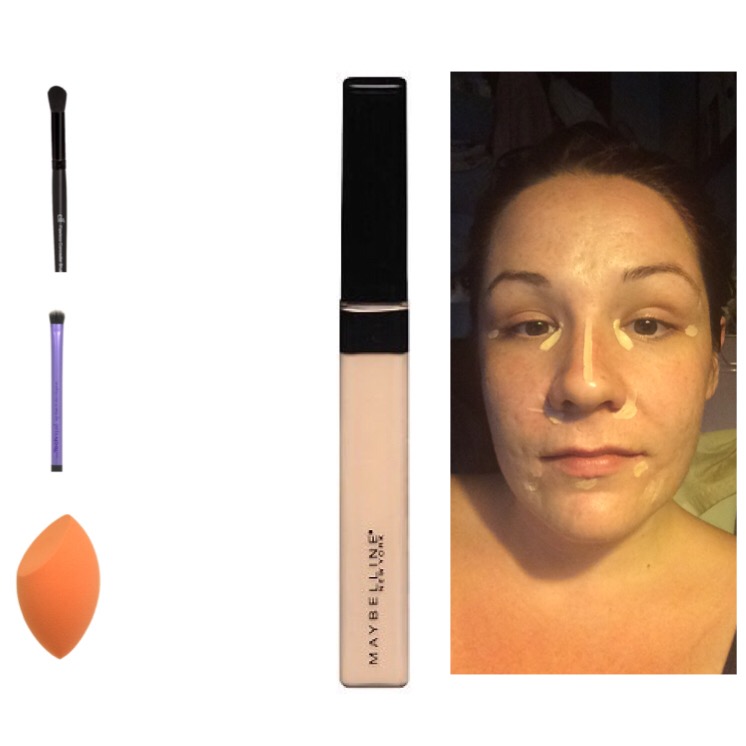
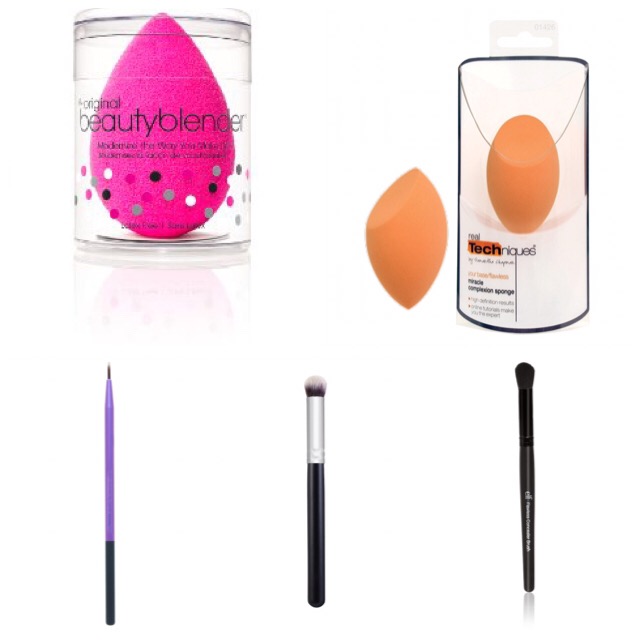
If you’re applying concealer to the under eye area, I generally like to apply it with a damp sponge. It helps to blend it seamlessly, absorb excess product (which helps avoid cake face), and adds a little extra hydration to a typically delicate, drier area, versus tugging at it with a brush. No matter the formula you’re working with, I always recommend patting motions with your sponge, pouncing it up and down, while moving back and forth from the inner corner of the eye to the outer corner, and back again. This ensure that the concealer isn’t applied in just one direction, and will aid in keeping it from settling into those tiny little fine lines hiding under the lashes; you know, the ones that seem to be especially highlighted with concealer. One of my favorite sponges, besides the beautyblender, is the Real Techniques Miracle Complexion Sponge. I love it for it’s flat edge that really allows you to get up under the lashes.
If you’re working to conceal a blemish, particularly spot concealing, I like to first apply the product with a fine tip brush, like the Real Techniques Fine Liner Brush, and blend it out either with my ring finger (clean, of course!) or a dense, synthetic brush like the Morphe M173 or the e.l.f. Flawless Concealer Brush. Again, regardless of whether you choose to use a brush or your finger, I recommend patting motions with light pressure. The only advantage to using a brush over your finger, I’ve found, is that the bristles of the brush help to push the product into your skin and give it a very skin like finish, whereas the heat of your finger can actually warm up the product too much, to where it starts to slip and slide around.
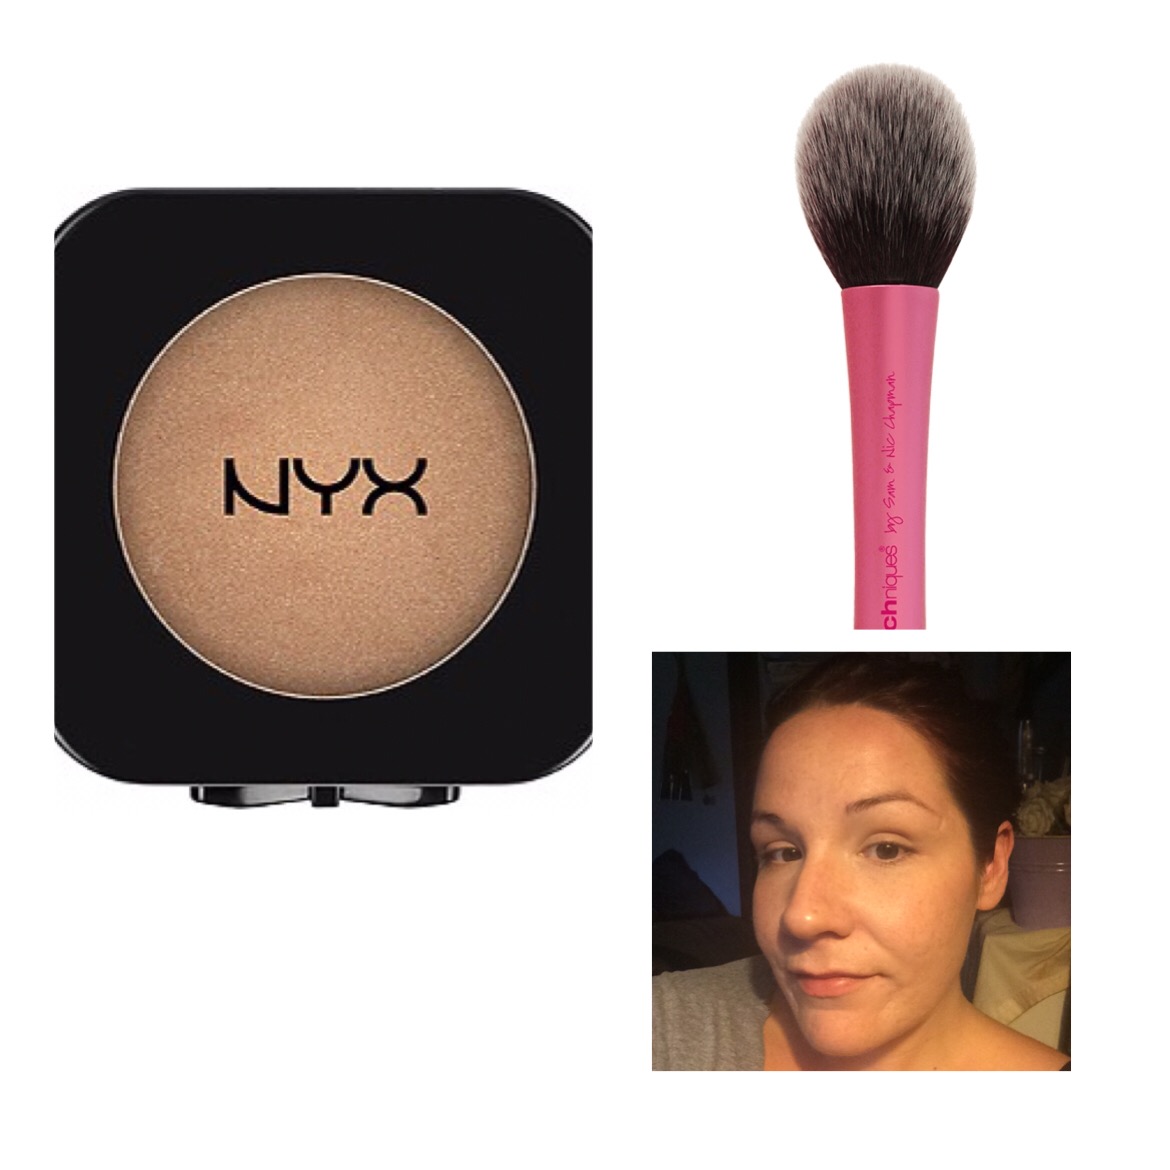
No matter what tools you choose to apply your concealer, always set it with a powder! This ensures that your hard work wasn’t for nothing!

WHAT’S THE DEAL WITH COLOR CORRECTING?

Color Correcting can seem intimidating, but it’s actually a very necessary step in properly concealing, well, anything. A lot of brands are starting to introduce color correctors as a regular part of their product lineup, including Urban Decay and even the Sephora collection. They too, like concealers, come in varying formulas from cream palettes to more fluid consistencies in tubes.
For a comprehensive look at color correcting, refer to the color wheel below. Yes, the color wheel. That thing that your art teacher used to teach you color theory; the idea is to use the opposite color of the one you’re trying to conceal, or correct. Under eye bags with a purple tint? Use a yellow based corrector. Are they more blue? Try something orange. Need to cover a stubborn red blemish? Green will be your new best friend. Basically the shade you want to correct with is the shade opposite of what you’re trying to cover.
I know, it seems tricky, but a little practice makes perfect!

WHAT ARE SOME OF MY FAVES? 

Oh, here comes the fun part! Like I said, concealer is one of, if not my absolute, must-have beauty item.
If I had to choose just one go-t0 concealer for everything and anything, it would be the Urban Decay Naked Skin Weightless Complete Coverage Concealer. It’s hydrating, it covers redness, blemishes, hyper-pigmentation, it looks like skin, it’s demi-matte, and it stays on all day.
One that I find myself reaching for when I have a particularly stubborn blemish, or when I need something thicker to clean up my brows or winged liner, is the Hard Candy Glamoflague Concealer. This one is super full coverage, and you literally only need the a pin-head sized amount to cover just about anything on your face. A word of caution though; this is incredibly thick, creamy, and richly pigmented, so I don’t recommend using this under the eyes.
Something that is great for under the eyes, however, as well as cream contouring and highlighting, is the Maybelline Fit Me Concealer. With a standard drugstore shade range of six shades, the lightweight, gel-like consistency and buildable formula makes this my most reached for drugstore concealer on a regular basis! Another great under-eye concealer (that I feel is highly underrated) is the Garnier Anti-Dark Circle Concealer, which is a sheer formula with a roller ball applicator and skin care ingredients! Does it get better?!


What are some of your concealer tips and tricks? What about your faves? Leave me a comment and let me know!

Come follow me around social media!
Twitter, Pinterest & Instagram : @dlynnesposito
Facebook : Affordable Gorgeous
Snapchat : dlynnesposito

And feel free to reblog this post and share my social media with your friends! Your support means so much!

LOTS OF LOVE!!
img_9363-2

REVIEW – URBAN DECAY NAKED SKIN WEIGHTLESS COMPLETE COVERAGE CONCEALER

Screen Shot 2016-05-04 at 5.24.53 AM

Hey guys!

No, no, I haven’t disappeared! There’s a lot going on, and I’ve been unbelievably busy, but I have all intentions on getting back to a normal schedule in the coming weeks.

I have a review for you today, on the Urban Decay Naked Skin Weightless Complete Coverage Concealer ($28), obviously. In the beginning, I had such a love/hate relationship with this product, which I’ll get into shortly, but I realized that as much as I’ve been using it lately, I had yet to review it!

Clearly this isn’t a new product, as it’s been around for like, what? Almost two years now? But it’s certainly a very popular one! Let’s see what Urban Decay has to say about their product:

Hide even your most scandalous flaws. Naked Skin Weightless Complete Coverage Concealer gives you buildable, even coverage with a luminous, demi-matte finish. Ultra lightweight, this high-tech formula melds like a second skin to give you full coverage in an instant. For complete coverage, just keep building; no matter how much you apply, Naked Skin Concealer always blends beautifully and NEVER settles into fine lines.

We loaded Naked Skin Concealer with lots of ingredients that are good for your skin. Matrixyl 3000 contains anti-wrinkle peptides to improve skin’s youthful appearance and elasticity. Japanese green tea revitalizes and helps reduce the appearance of fine lines. Litchiderm™ (derived from lychee fruit) protects against dehydration, resulting in a brighter, more radiant complexion. And sodium hyaluronate helps skin attract and retain moisture.

Let’s get started!


PACKAGING

Screen Shot 2016-05-04 at 5.27.55 AMWith this concealer you get 0.16 fl oz of product, which isn’t a crazy amount of product when you compare it to other concealers.
Part one of my love/hate relationship with this concealer lies with the packaging; while I like that it’s very sleek, with it’s silver twist-off cap, and large, flexible, flat applicator wand (which dispenses the perfect amount of product with one dip), I believe the actual bottle containing the concealer is glass – I could be wrong, but it sure feels like glass, which makes me reluctant to put it in my bag and take along during the day, God forbid travel with it.

FORMULA

The formula is very fluid and lightweight, almost gel-like in it’s consistency. This concealer comes in 11 shades, but I highly suggest getting color matched in store. The shades run incredibly light, and if you’re fair to medium skinned, it can be tricky to find your perfect shade. Searching reviews and forums isn’t much help either, so as a reference, I’m roughly an NC15 (fair to light with warm undertones) and I finally settled on the shade Light Warm, though I was matched to Fair Neutral. Fair Neutral looks like white paint in a tube.

APPLICATION & WEAR

The most common method of application I’ve seen used with this concealer is the highlighting method; you know what I mean, under the eyes, the forehead, nose, cupids bow, and chin. Pretty standard.
I can use this to highlight, however because it’s so close to my natural skin color, I can also  slap it all over and wear it as a “foundation”, if you will, which is usually what I do.
The best way that I’ve found to apply this is with a damp sponge. Typically, a damp sponge will sheer out your product, but because this has such a high level of pigmentation, I find that I get a solid medium to full coverage on the first pass. For particularly stubborn areas like blemishes, I simply go back and add a little more (it really doesn’t get cakey, so I love that about it!) and then dab over the top and around the edges with a concealer brush like the e.l.f. Flawless Concealer Brush, or even my Morphe M173. If you have dry skin, you probably don’t have to worry about setting this with a powder, but for the sake of not finding out the hard way on my combination skin, I usually set it with my It Cosmetics Bye Bye Pores Silk HD Micro Powder on a fluffy brush, and it stays put all day.
One of the most notable features of this concealer is that it’s really quite comfortable and hydrating, while having a demi-matte finish. Something that I appreciate. As any surface oil starts to peek through, it just looks like dewy skin, not an oil slick, and it doesn’t break apart on me like most concealers do. And so far, it hasn’t broken me out – win!!

img_1346-1

No foundation, just this concealer 🙂

Overall Rating : 4.5/5
(.5 off for packaging and shade selection) 


Have you guys tried this concealer? What are your thoughts? Do you have any other favorites? Leave me a comment and let me know!

Come follow me around social media!
Twitter, Pinterest & Instagram : @dlynnesposito
Facebook : Affordable Gorgeous
Snapchat : dlynnesposito

And feel free to reblog this post and share my social media with your friends! Your support means so much!

LOTS OF LOVE!!
img_9363-2

5 PRODUCTS FOR A 5 MINUTE FACE

Most days when I’m not going anywhere, I don’t bother to put on makeup. I like to let my skin breathe as much as possible. Yesterday was one of those days. But later in the evening I had to run out briefly to pick up my husband from work and run to the grocery store. Usually I’ll go out without a drop of makeup on and not think twice. But for whatever reason, my brain said ‘just put on a little‘, so to the vanity  I went.

As I sat down, I knew I wouldn’t have much time, so I figured I would make a game of it. A challenge. I wanted to use as few products as possible, as quickly as possible, and get out the door looking polished and pulled together. So I got to work.

This is a look that you can do in 5 minutes or less, with 5 products and 3 tools – fantastic for busy mornings or just a minimal makeup day, this will have you out the door in no time at all!

Let’s get started!


CONCEALER – 1 min 16 sec


 Naturally this is the first step after your skin care. If you feel the need to use a primer, that’s fine. But for the sake of keeping time and products to a minimum, I skip primer and foundation and go straight for the concealer. My Holy Grail concealer at the moment is my Maybelline Fit Me Concealer ($7), and I have mine in the shade ‘fair’. I apply it only to the areas that need the most attention – the very inner corner of the eye, the outer corner of the eye (I sometimes get a little bit of redness in that area), on the sides of my nose (another place of great redness, but almost all women get redness here, it’s just hormonal), a stripe down the center of my nose (gets a little red here too) and of course any blemishes. Then I like to blend it out with the e.l.f. Studio Flawless Concealer Brush ($3), or for more pinpointed areas like blemishes, the Real Techniques Shading Brush ($7), keeping it pretty much in the areas I need the coverage, but I will take whatever is leftover on the brush and use it on my eyelids, because they can get pretty veiny. You could also use a damp beauty sponge, the choice is yours. I recommend the Real Techniques Miracle Complexion Sponge ($7), and between you and me – I like it BETTER than a Beauty Blender! SSSHHHHH!

BRONZER – 16 sec


 After all that concealer (even though it wasn’t really that much) it’s time to bring some color back to the face. I found myself reaching for a blush and thought “well if you do that, you’ll look like a porcelain doll and not like a HUMAN”, so instead I grabbed a bronzer. Well, kind of. The NYX HD Blush in ‘Nude’Tude’ ($7) is technically a blush, but it’s a pretty, not too warm honey shade that just brings you back to LIFE! I lightly dust that on the outside of my face and a little tiny bit on either side of my nose with a Real Techniques Blush Brush ($9).

BROWS – 37 sec


 Brows make your look. When they look more polished, even if it’s just basic grooming with a little clear brow gel, you feel like you can take on the world. Yup, brows are pretty powerful like that! So I like to use the Anastasia Beverly Hills Clear Brow Gel ($22) for this step. I know, it’s not drugstore. It’s a little on the pricey side for a clear brow gel, or ANY brow gel – but this stuff is SUPER GLUE on your brows – and I actually got mine for $11 when ULTA ran their ‘21 Days of Beauty‘ promotion back in September – and I’m such a believer that my cheap butt WILL be purchasing more when I run out! If you’re someone who absolutely needs a some color to their brows, the ULTA Brow Tint ($10) is a great option, and it has that teeny tiny brush reminiscent of the Benefit Gimme Brow ($24), but for way less!

EYES – 1 min 36 sec


 I kept it simple here – just curling my lashes (any old lash curler will do, mine came from TJ Maxx) and applying 2-3 coats of CoverGirl Lash Blast Clump Crusher Mascara ($8) in Brown. A brown mascara looks more natural, so you don’t feel like the rest of your face has to compete with your lashes. I did both my top and bottom lashes, because the curved brush fits perfectly and I don’t have to reach for something totally different for those pesky little bottom ones.

LIPS – 18 sec


 Here you can do whatever you want. But back in August I discovered the ULTA Brilliant Color Lip Glosses ($8), and fell in love. My favorite shade is Guava, and I think I have a few stashed away as backups too, in case they go and discontinue the shade! It’s a pretty, very glossy but not too sticky, natural pink shade that just looks fresh and girly. If you like something a little richer in pigmentation, you could always use the Burt’s Bees Lip Gloss in Evening Glow ($7), which is a little on the redder side, and not too sheer or too opaque, it’s pretty much right in the middle. When I’m doing minimal makeup, I just feel like I need a glossy lip. A lot of the ULTA brand cosmetics I feel are very underrated, and I don’t hear them mentioned often, but I really love them. There are some great quality items, but I’ll save that for another time!


There you have it! Now all you need is a messy bun or some cute earrings and you’re ready for your day! This is a go-to look for me most days because, like many moms of toddlers, I treasure any extra moments of sleep I can salvage!


How do you get ready on busy mornings? What are your HG products to achieve an effortless, put together look? Leave me a comment below!

And don’t forget to follow me on Twitter and Instagram @dlynnesposito, and go like the new Affordable Gorgeous page on Facebook!

LOTS OF LOVE AND EXTRA ZZZ’S!!